How to Attach a Camera to an RC Car: A Comprehensive Guide
The first time I strapped a tiny camera to a roaring RC buggy and watched the footage back, I was hooked. It felt like shrinking down and riding shotgun. That curiosity spiraled into weeks of tinkering, testing, and a borderline obsession with dialing in crisp, stable FPV footage.
If you’ve been wondering how to attach a camera to an RC car or how to perfect your RC car camera setup, you’re in the right place. In this guide, I’ll share what actually worked for me—from picking the right camera and mount to taming vibrations and powering the whole setup reliably. We’ll explore classic options like adhesive mounts and brackets, dabble in 3D-printed solutions, and end with a rock-solid, repeatable process you can trust.
Whether you’re into remote control car modding or eager to enhance your RC vehicle photography, understanding various camera mounting systems is key. By the time you finish, you’ll be ready to build your own RC camera rig and capture the kind of footage that makes you grin when you hit play, elevating your FPV camera installation skills to the next level.
Selecting the Right Camera for Your RC Setup
There’s no single perfect camera for RC car recording — the best choice depends on your driving speed, terrain roughness, and how you want to view footage. When considering the best camera for RC car recording, understanding the different types available helps you find the ideal fit for your setup.
For high-quality recorded footage, action cameras like GoPro, DJI, or Osmo models stand out. They offer great image quality with built-in stabilization and ruggedness.
However, they tend to be heavier and come at a higher cost. In contrast, micro action cams such as the Insta360 GO-style or thumb cams provide a very light, simple solution but may suffer from limited battery life and heat issues.
If your priority is a first-person view RC setup with ultra-low latency live viewing, FPV cameras combined with video transmitters (VTX) deliver an immersive experience. Although they require a receiver or goggles and more complex recording setups, their weight is minimal.
For ultra-light builds or tiny cars, ultra-micro “keychain” cams or TinyWhoop cams offer a cheap, ultra-lightweight option but with lower image quality and rolling shutter effects.
| Camera Type | Pros | Cons | Weight | Price |
|---|---|---|---|---|
| Action camera (GoPro/DJI/Osmo, 4K/2.7K) |
Great image quality, built-in stabilization, rugged | Heavier, higher cost | 75–160 g | $150–$400+ |
| Micro action cam (Insta360 GO-style, thumb cams) |
Very light, simple | Limited battery, heat | 18–35 g | $100–$300 |
| FPV cam + VTX (analog/digital) |
Ultra-low latency live view, immersive FPV | Needs receiver/goggles, recording relies on DVR or split systems | 8–30 g (cam), 3–20 g (VTX) | $25–$200+ |
| Ultra‑micro “keychain” cams/TinyWhoop cams | Cheapest, ultra-light | Lower quality, rolling shutter | 5–15 g | $10–$40 |
During testing on bumpy dirt tracks, I found that heavier action cams equipped with built-in stabilization resisted micro-jitter better than ultra-light cams mounted rigidly. However, on smaller cars, a micro cam with a soft-damped mount outperformed heavier cameras that compromised handling. This highlights the importance of camera brackets and mounts designed for RC car vibration reduction to optimize footage quality and vehicle dynamics.
For more detailed tips on mounting action cameras specifically on RC cars, check out this resource on camera brackets and mounts.
If aerial FPV inspires you, many of the same principles apply from this RC airplane perspective, enhancing your overall RC footage experience.
Preparing the RC Car for Mounting
Before you stick or screw anything down, thorough RC car preparation is essential to ensure optimal performance and longevity. Surface cleaning plays a crucial role, as oils and dust can ruin adhesion and compromise your setup. Here’s a checklist I rely on to optimize stability and maintain proper balance evaluation:
- Clean the shell/chassis: Wipe the surface with isopropyl alcohol and allow it to dry fully to ensure perfect adhesion and remove contaminants.
- Inspect mounting zones: Select flat, reinforced areas such as near shock towers or chassis plates rather than flimsy body panels to provide a sturdy foundation.
- Balance matters: Position heavier cameras or components low and near the longitudinal center to prevent instability — avoid hanging mass off tall bodies or weak lexan edges.
- Mock-up test: Temporarily tape the camera or parts in place and gently drive to feel handling changes before making permanent modifications.
- Cable routing: Plan strain relief carefully and route cables to avoid interference with steering or suspension mechanisms.
- Electronics sanity check: When customizing electronics, consult primers on safe layouts and soldering fundamentals to ensure reliability (see guide).
- Alternate builds: Working with studded plastics or plates?
Some preparation steps vary for brick-built platforms like these (see example).
Incorporating these best practices related to surface cleaning, body modification, balance evaluation, and stability optimization will transform your rig from a wobbly mess into a dream machine that’s both durable and precise.
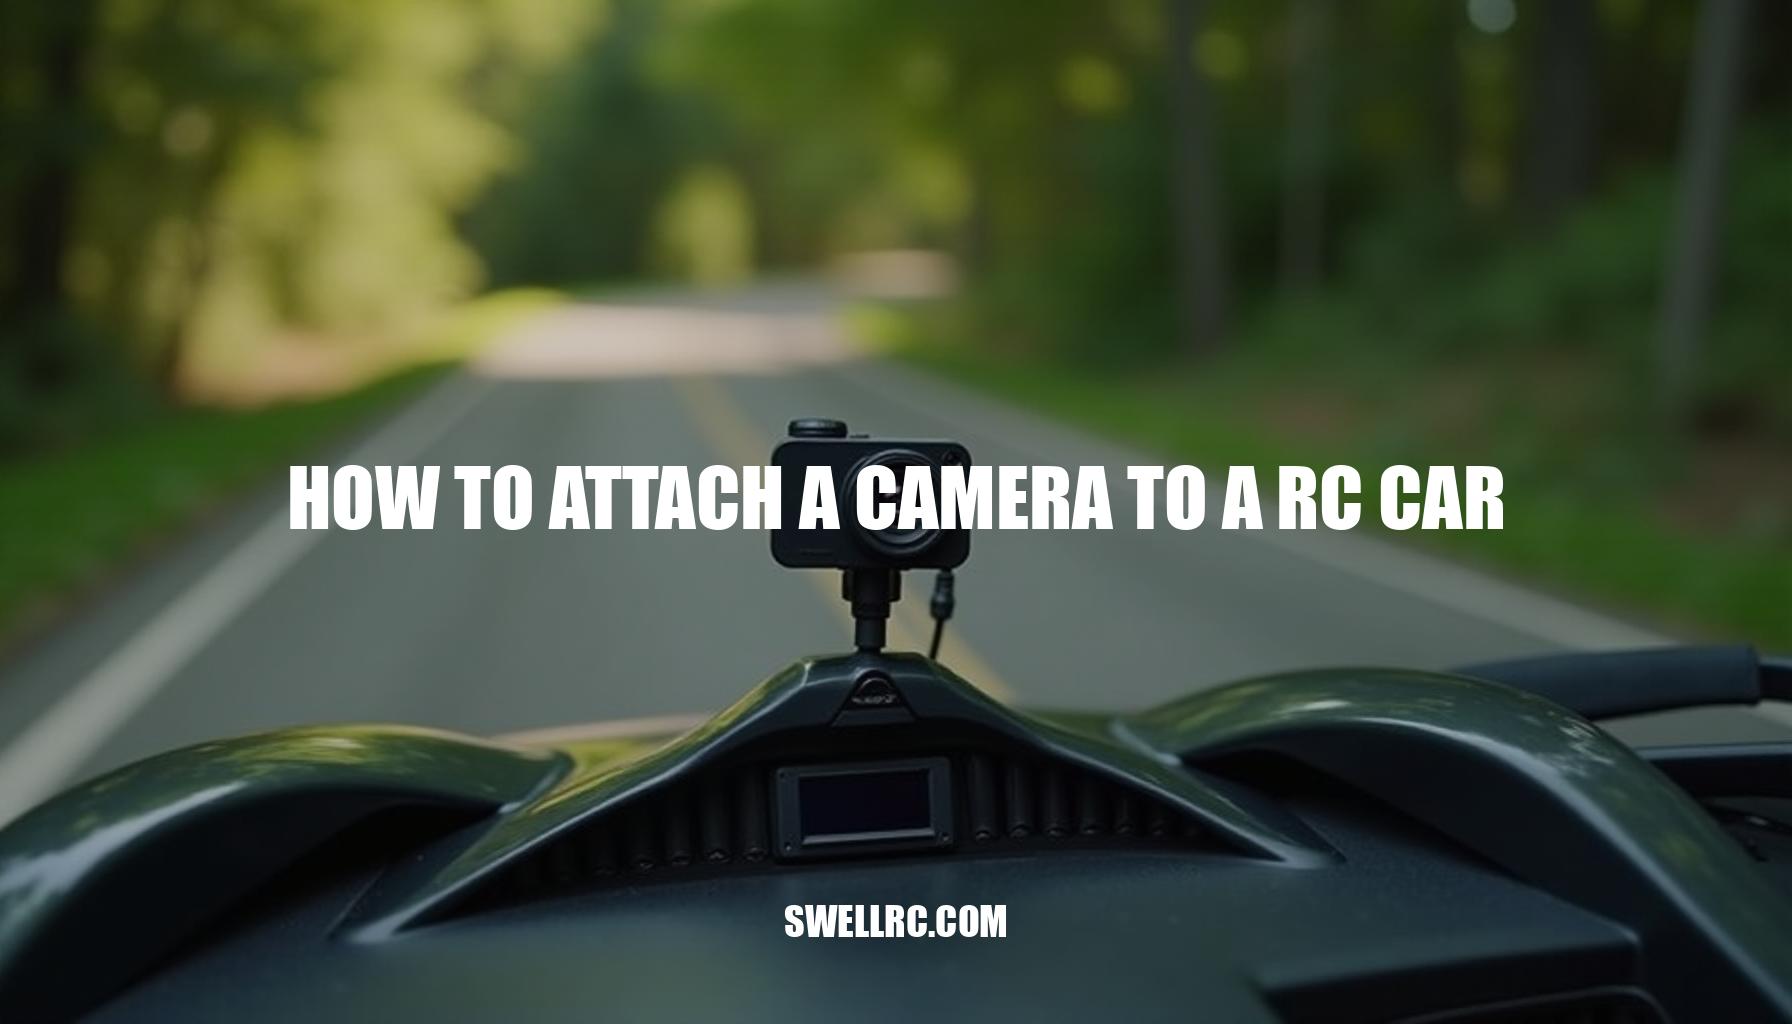
Step-by-Step Mounting Process
In this step-by-step RC car camera mount tutorial, I’ve explored every option from zip ties to precisely engineered 3D-printed cradles to find the perfect balance between stiffness and damping for a quality camera mounting system. The key lies in pairing soft vs rigid mounts to achieve firm control during direction changes while effectively controlling high-frequency buzz through vibration damping. Rigid mounts offer a sharp feel with minimal lag but tend to transmit vibration, making them ideal for smooth asphalt tracks and setups with built-in stabilization.
On the other hand, soft-damped mounts that incorporate foam or rubber layers absorb micro-jitters, which is perfect for rough gravel or dirt terrain and lightweight cameras.
For reliable mounting, I use essential tools such as Phillips screwdrivers, 2.5/3.0 mm hex drivers, 3M’s high-bond adhesive pads (VHB), plastic or metal brackets, small foam or neoprene pads, zip ties, safety tethers, plus mini ball head or tilt plates often found in mini tripod brackets setups.
Here is my proven 7-step flow for optimal camera mounting:
- Plan the shot: Choose your viewpoint – hood, roof, bumper, or interior FPV. Generally, lower mounts yield smoother footage, while forward-facing ones convey the fastest sense of speed.
- Dry-fit & balance: Tape the camera temporarily and perform a slow roll test to check for clearance and balance issues.
- Prep surface: Clean mounting surfaces thoroughly; scuff glossy plastics lightly if using adhesives to improve bonding.
- Build the mount: Stack components like bracket, foam pad, and adhesive, or screw brackets directly into reinforced chassis points while avoiding thin lexan panels.
- Secure & damp: Press adhesive firmly for 30–60 seconds; add foam shims to tune damping; attach a safety tether to prevent loss.
- Cable discipline: Route cables carefully with slack loops; tie them securely with zip ties away from driveshafts and steering linkages.
- Calibrate horizon: Level the camera, lock tilt settings, then record a 10–20 second test clip to verify orientation and stability.
Remember, even tiny custom chassis can successfully mount cameras if they stay lightweight and low to the car body. For micro die-cast car conversions, this approach aligns well with the constraints discussed in guides like this comprehensive resource.
Integrating these tips ensures your camera mounting systems maintain stability and capture smooth footage regardless of terrain or vehicle size.
Testing and Fine-Tuning Your Recording Setup
Testing days are my favorite: a parking lot for baseline, then a chunky gravel path to stress the mount. Record short runs, review, tweak, repeat. Small changes in angle or foam thickness can turn usable into cinematic.
When learning how to stabilize camera footage on an RC car, it’s important to start flat—verify horizon alignment, focus accuracy, and rolling-shutter stability—before advancing to rough terrain where bumps and curbs can cause jello or oscillations.
- Flat first: verify horizon, focus, and rolling-shutter stability.
- Then rough: introduce bumps and curbs; watch for jello or oscillations.
- Angle iterations: tiny 2–5° tilt changes dramatically affect speed sensation.
Remote syncing and control add new layers to footage evaluation and operation. If your transmitter/receiver setup needs pairing or re-binding, this refresher helps: how to sync RC car remote. For wireless FPV video feed enthusiasts, steering and monitoring from a computer is possible: control an RC car with a computer.
And exploring wireless control builds over Bluetooth is achievable with this project: make Bluetooth RC car.
| Problem | Cause | Solution |
|---|---|---|
| Shaky/jello footage | High-frequency vibration; rolling shutter | Add foam/rubber damping, lower mount position, balance wheels/tires, tighten loose body posts, enable in-cam stabilization, try ND filter to lower shutter speed |
| Camera tilts mid-run | Weak adhesive or loose joint | Switch to high-bond VHB, add mechanical backup (screw/strap), use safety tether |
| RF interference in FPV feed | Antenna placement/power noise | Separate VTX antenna from receiver/ESC wires; add ferrite ring; clean power via regulator |
| Video drops or app disconnects | Wi‑Fi/Bluetooth congestion or power dips | Change channel, get line of sight, isolate power rails, use dedicated FPV link for mission‑critical viewing |
Optional image ideas include side-by-side frame grabs comparing undamped vs. foam-damped mounts and a horizon-leveling overlay to visualize tilt correction. A pro tip for controlling your camera is to use many action cams’ phone apps to remotely start and stop recording.
Simply connect to the camera’s Wi-Fi, preview your framing, hit record, stash away the phone, and focus on your drive. This approach streamlines workflow when working on how to stabilize camera footage on an RC car and managing a wireless FPV video feed, providing better insights during footage evaluation and troubleshooting shaky video issues with ease.
Power and Connectivity Options
Powering RC camera setups efficiently is crucial, as many builds stumble due to brownouts, noise, and heat — issues that can ruin your recording session or degrade live FPV streaming quality. Stabilizing the power draw ensures consistent feed quality and safe wiring for all components.
Here’s an overview of options for powering your RC camera, leveraging battery taps, shared circuits, and isolated power sources to minimize interference and maintain reliability:
| Scenario | Power Source | Wiring | Notes |
|---|---|---|---|
| Scenario A Action cam recording only |
Internal battery (self-powered) | None | Bulletproof for beginners; simplest and most reliable for recording with no wiring needed. |
| Scenario B FPV cam + VTX from BEC |
ESC/BEC 5 V out | Through LC filter to FPV cam/VTX | Keep amps within BEC limits; add ferrite ring to reduce noise; isolate from servo spikes for safe wiring. |
| Scenario C Main pack to buck regulator |
2S–4S pack → buck regulator (5/9/12 V) | Wired from main battery pack | Choose regulator with 2× headroom; use heat-sink if enclosed to avoid heat issues. |
| Scenario D Isolated auxiliary LiPo |
Small 1S/2S LiPo | Separate wiring for FPV gear | Cleanest signal with minimal noise injection; minor weight penalty. |
Additional tips for optimizing your setup include:
- Remote/control integration: Program transmitters and mix spare channels to trigger camera tilt servos or control VTX power for flexible shot framing.
- Connectivity: Use action cam microSD cards or FPV DVRs for recording; split systems provide high-resolution footage alongside live feeds.
- Live view options: Analog VTX with goggles or monitor offers low latency, whereas digital links bring higher clarity but may introduce delay.
- App control: Wi‑Fi/Bluetooth camera apps are great for preview and configuration but avoid them for real-time driving due to latency risks.
For beginners, starting with a self-powered action cam (Scenario A) simplifies power concerns. When tapping shared vehicle power circuits (Scenario B or C), always isolate your camera and VTX from servo spikes and avoid exceeding current limits to ensure longevity and reliable recording. Employing an isolated auxiliary pack (Scenario D) is optimal for reducing noise in live FPV streaming, helping you achieve a clean, uninterrupted feed.
Beyond the Basics — Advanced Mods and Creative Builds
Once your camera rig is humming, the fun really starts with advanced RC mods and creative FPV builds. Experimenting with custom circuits, servo-driven gimbals, and scripts that dynamically change camera angles mid-run opens up a world of possibilities. I’ve had unexpected successes — like mounting a 10 g micro cam on a drift chassis — and a few spectacular fails (ask me about the mud puddle that ate a VTX).
Each attempt is a valuable lesson that helps refine your approach for smarter next steps in your smart RC control systems.
Here are some exciting ideas to try next:
- 3D-printed vibration-isolating mounts tuned with different durometer bushings to enhance stability.
- Servo-tilt platforms on spare channels for precise horizon control, especially on steep hills.
- Split FPV systems combining HD board cameras for high-quality recording and low-latency analog previews.
- Onboard telemetry overlays that log speed and RPM, composited during post-production.
- Brick-built RC bodies featuring internal camera cages for innovative LEGO-style projects.
- Hybrid ground/air experiments enabling quick camera swaps between an RC car and a micro quad for multi-perspective footage.
- Software workflows involving batch stabilization, customized color profiles, and ND filter kits calibrated to typical lighting conditions.
Remember to treat every run as a mini-experiment: adjust one variable at a time and keep detailed notes. These experimentation tales will guide your progress and fuel your creativity in the realm of advanced RC modifications and FPV innovations.
Conclusion — Capturing the Drive
Mounting a camera on an RC car is a thrilling blend of RC customization and pure play, opening up new horizons for FPV storytelling. To achieve a stable recording setup, you start by selecting the ideal camera that suits your filming needs. Next, carefully prep your RC car and engineer a mount with the perfect stiffness to minimize vibrations.
This hands-on process perfectly captures the essence of DIY RC filming, where tuning power and adjusting angles transform raw footage from shaky to buttery-smooth.
Here’s a quick overview from the RC car camera guide perspective:
- Choose the right camera: Consider weight, size, and resolution for your RC car.
- Prepare your RC car: Ensure the chassis and wiring can accommodate your camera setup.
- Build a sturdy mount: Use materials that balance rigidity and lightness for vibration dampening.
- Tune power and angles: Optimize angle settings and power delivery for smooth, dynamic footage.
Once you master these steps, the satisfaction of progressing from your first shaky clip to flawless laps is immense. Armed with confidence from this RC car camera guide, go out and capture exhilarating drives, chase sunsets across empty parking lots, and keep refining your setup. Remember, the best shot is always just one run away!
Frequently Asked Questions
- What kind of camera can I attach to an RC car?
Popular choices include action cameras (great image quality and stabilization), micro action cams (very light), FPV camera + VTX systems (low-latency live view), and ultra‑micro keychain/TinyWhoop-style cams (cheapest and lightest). Pick based on weight limits, desired quality, and whether you need live FPV. - How do you mount a GoPro on an RC car securely?
Use a flat or curved high-bond adhesive mount on a reinforced, low, central spot. Add foam/rubber damping between bracket and body to cut vibrations, and back it up with a safety tether or screw-in bracket. Keep it low to reduce roll and wobble. - What’s the best way to power a camera on an RC car?
For action cams, use their internal battery for simplicity. For FPV gear, either tap a clean 5 V BEC line (within current limits) with an LC filter, or use a buck regulator from the main pack. A separate small LiPo for FPV gives the cleanest video but adds weight. - Can I control an RC car camera remotely?
Yes. Action cams often support start/stop via Wi‑Fi or Bluetooth apps, some have physical remotes, and FPV rigs provide live view via VTX to goggles/monitors. You can also use a spare radio channel to trigger a tilt servo or power a VTX on/off via a switch. - How do you prevent shaky footage on rough terrain?
Mount the camera low and centered, use foam or rubber damping, balance wheels/tires, tighten body posts, enable in-camera stabilization, and consider an ND filter to lower shutter speed and reduce jello. Adjust mount stiffness to match terrain.