How to Build a RC Car Frame: A Comprehensive Guide
The day I stopped copying stock chassis plates and started shaping my own frame, everything clicked. After a dozen frame redesigns, I finally learned why stiffness matters more than thickness and why a millimeter of alignment error can feel like a foot on the track. Building an RC car frame is like crafting the skeleton of a full‑size car: it carries the muscles (motor and drivetrain), protects the organs (electronics), and determines how the whole creature moves.
In this comprehensive guide, I’ll show you exactly how to build an RC car frame from scratch—covering materials, design choices, layout math, step‑by‑step fabrication, integration, testing, and fixes—so you can turn raw sheet and tube into a razor‑sharp chassis that perfectly fits your driving style. Expect to sketch, measure, cut, drill, countersink, reinforce, and test like a pro. And yes, there’s huge creative freedom here: whether you want a featherweight carbon pan for speed runs or a rugged ladder frame that shrugs off rocks, we’ll map out the path.
Along the way, we’ll explore key concepts like stiffness vs thickness, alignment precision, handling, and vibration control to enhance your build. Whether you’re upgrading from basic hobby kits or diving into advanced DIY RC projects, this knowledge applies widely across all remote control vehicles. Ready to build the foundation of your RC masterpiece?
Let’s dive in.
Understanding the RC Car Frame: Structure, Purpose, and Physics
The RC frame acts as the critical load-path architect of your model, expertly managing load distribution by carrying batteries, electronics, and drivetrain components without sagging. It ensures precise alignment by keeping axles square and parallel, maintaining consistent toe and camber under load, which is essential for optimal handling. The design must skillfully manage cornering, acceleration, and landing forces through stiff paths, providing excellent torsional rigidity.
Additionally, effective vibration damping is vital to reduce noise, vibration, and harshness (NVH), thereby protecting delicate parts and stabilizing sensitive sensors.
Core elements of the chassis include:
- Chassis plate or rails
- Crossmembers and side rails
- Shock towers
- Mounting points for motor, battery, ESC, receiver, and servo
- Skid plates and body posts
- Bumpers
The material choice of your chassis plate profoundly influences performance characteristics such as stiffness, weight, and damping. Here’s an overview of common materials used in RC frames:
| Material | Pros | Cons | Typical Cost |
|---|---|---|---|
| Reinforced plastics (ABS/nylon) | Forgiving, inexpensive | Flexible under heat/impact | Low |
| Aluminum chassis (6061 easy, 7075 premium) | Tough, repairable | Heavier than carbon | Medium |
| Carbon fiber RC frame | Ultra-stiff, super light | Brittle at edges, pricier | High |
| G10/FR4 (fiberglass laminate) | Strong, easy to machine | Heavier than carbon fiber | Low – Medium |
| Steel/tubing (for crawlers) | Weldable, very durable | Heavy | Low – Medium |
Many racing and crawler kits leverage tuned blends of these materials to optimize performance. Exploring buildable RC cars at sites like Swell RC offers inspiration on how custom alloys and component layouts influence your chassis’ functionality.
Ultimately, material selection and geometry form a duet that balances weight, stiffness, and vibration control to perfectly align with your driving goals.
Choosing the Right Material for Your Frame
Choosing the best materials for RC car chassis depends greatly on your performance targets, budget, and the tools you have at hand. Here’s a guide to help you select the right material:
- Aluminum (6061/7075): Ideal for bashers, trucks, and general-purpose use, aluminum chassis offer easy repairs. Thanks to its ductile nature, you can drill and tap aluminum at home, and it can often be bent back after mild impacts. However, watch for added weight and be cautious when countersinking holes to prevent stress risers.
- Carbon fiber (quasi-isotropic plates 2–3 mm): The go-to choice for on-road racing, speed runs, and precision handling due to its highest stiffness-to-weight ratio. A carbon fiber RC frame provides crisp steering feel. Be mindful of edge chipping; using washers or inserts helps reinforce mounting points.
Also, take safety precautions against dust when cutting carbon fiber.
- G10/FR4: Suitable for budget-conscious enthusiasts and beginners, these materials machine similarly to aluminum with hand tools and offer solid rigidity. They are slightly heavier than carbon fiber and benefit from sealing edges to prevent moisture ingress.
- Composite plastics (glass/nylon): Choose these when impact resistance and low cost are priorities. They are tough and forgiving but sensitive to heat and can creep over time, which may affect long-term performance.
- Hybrids (carbon fiber plates combined with aluminum standoffs/rails): If you want a lightweight, stiff, and serviceable chassis, hybrid chassis are excellent. They allow you to fine-tune rigidity with braces and mounts to achieve desired performance.
Key trade-offs to consider include:
| Factor | Impact |
|---|---|
| Weight vs. Rigidity | Lighter frames accelerate quicker, but excessive flexibility leads to wobble and unpredictable camber/toe changes under load. |
| Temperature Effects | Plastics soften with heat, aluminum expands, while carbon fiber remains stable but can be brittle at edges. |
| Maintenance | Aluminum frames can be straightened after damage; carbon fiber requires careful patching; plastics are often replaced entirely. |
Remember, suspension synergy plays a crucial role: frame stiffness affects how shocks and springs behave. If the chassis flexes too much, suspension tuning will become inconsistent. For more on balancing chassis rigidity with damping and spring rates, see how to make suspension for RC car (Swell RC guide).
Designing the Frame: Layout, Dimensions, and Engineering Logic
When learning how to design an RC car frame, it’s essential to start with the intent of your build, then focus on designing to accommodate the expected loads. Many enthusiasts find it helpful to sketch and mock up their chassis layouts using cardboard before committing to a digital blueprint with CAD or printed templates. Recognizing common chassis layout styles helps tailor your design appropriately:
- Pan chassis (flat plate + pods): Offers a low center of gravity (CG), ideal for on-road and drifting applications.
- Ladder frame (two rails + crossmembers): Favored in scale crawlers and trucks due to excellent torsional control via its robust frame.
- Tub chassis (molded tray): Commonly used for bashers and entry-level builds, providing easy component protection.
- Monocoque/sandwich: Provides premium stiffness, perfect for high-performance racing designs.
Wheelbase and track width are critical dimensions influencing handling and stability. For a 1/10 scale model, consider these guidelines:
| Type | Wheelbase (mm) | Notes |
|---|---|---|
| Drift | 255–270 | Wide track improves stability during slides. |
| Touring/Race | ~257 | Focuses on neutral balance for consistent handling. |
| Buggy | 280–300 | Longer wheelbase aids in jumps and straight-line control. |
| Crawler/Short Course Truck | 290–330 | Prioritize breakover angle and ground clearance. |
For example, a 540 motor and 2S LiPo on-road setup typically involves these dimensions and materials:
- Chassis plate thickness: 2.0–2.5 mm carbon fiber (CF) or 2.5–3.0 mm G10/aluminum.
- Battery bay size: approximately 138–140 mm by 47 mm to accommodate standard hardcase LiPo batteries.
- Servo mount spacing: center-to-center distance of 49–52 mm.
- Standoff height: ranges from 10 to 20 mm depending on body style and desired ride height.
Several engineering checks are vital for a successful design:
- Symmetry: Ensure left and right mounting points are within 0.25 mm to maintain balanced handling.
- Torsion path: Use triangulation with crossmembers around the motor cutout to optimize stiffness and durability.
- Center of gravity (CG): Keep heavy components low and close to the centerline to improve stability.
The electronics placement heavily influences your chassis layout. Plan for clean ESC and receiver mounting positions, optimal cooling pathways, and thoughtful wire routing. If designing your own control board or stacking PCBs, carefully plan standoff heights and signal line runs away from high-current motor leads.
For detailed guidance on circuit board layout, refer to resources like How to Make an RC Car Circuit Board.
Expect to iterate your design multiple times; each prototype reveals valuable lessons on where to add ribs for reinforcement, relieve stress concentrations at corners, or reposition slots for better fitment. By integrating these principles of chassis layout, wheelbase and track width selection, precise symmetry, center of gravity optimization, and triangulation into your mockups and blueprints, you’ll develop an RC car frame that performs reliably and handles predictably.
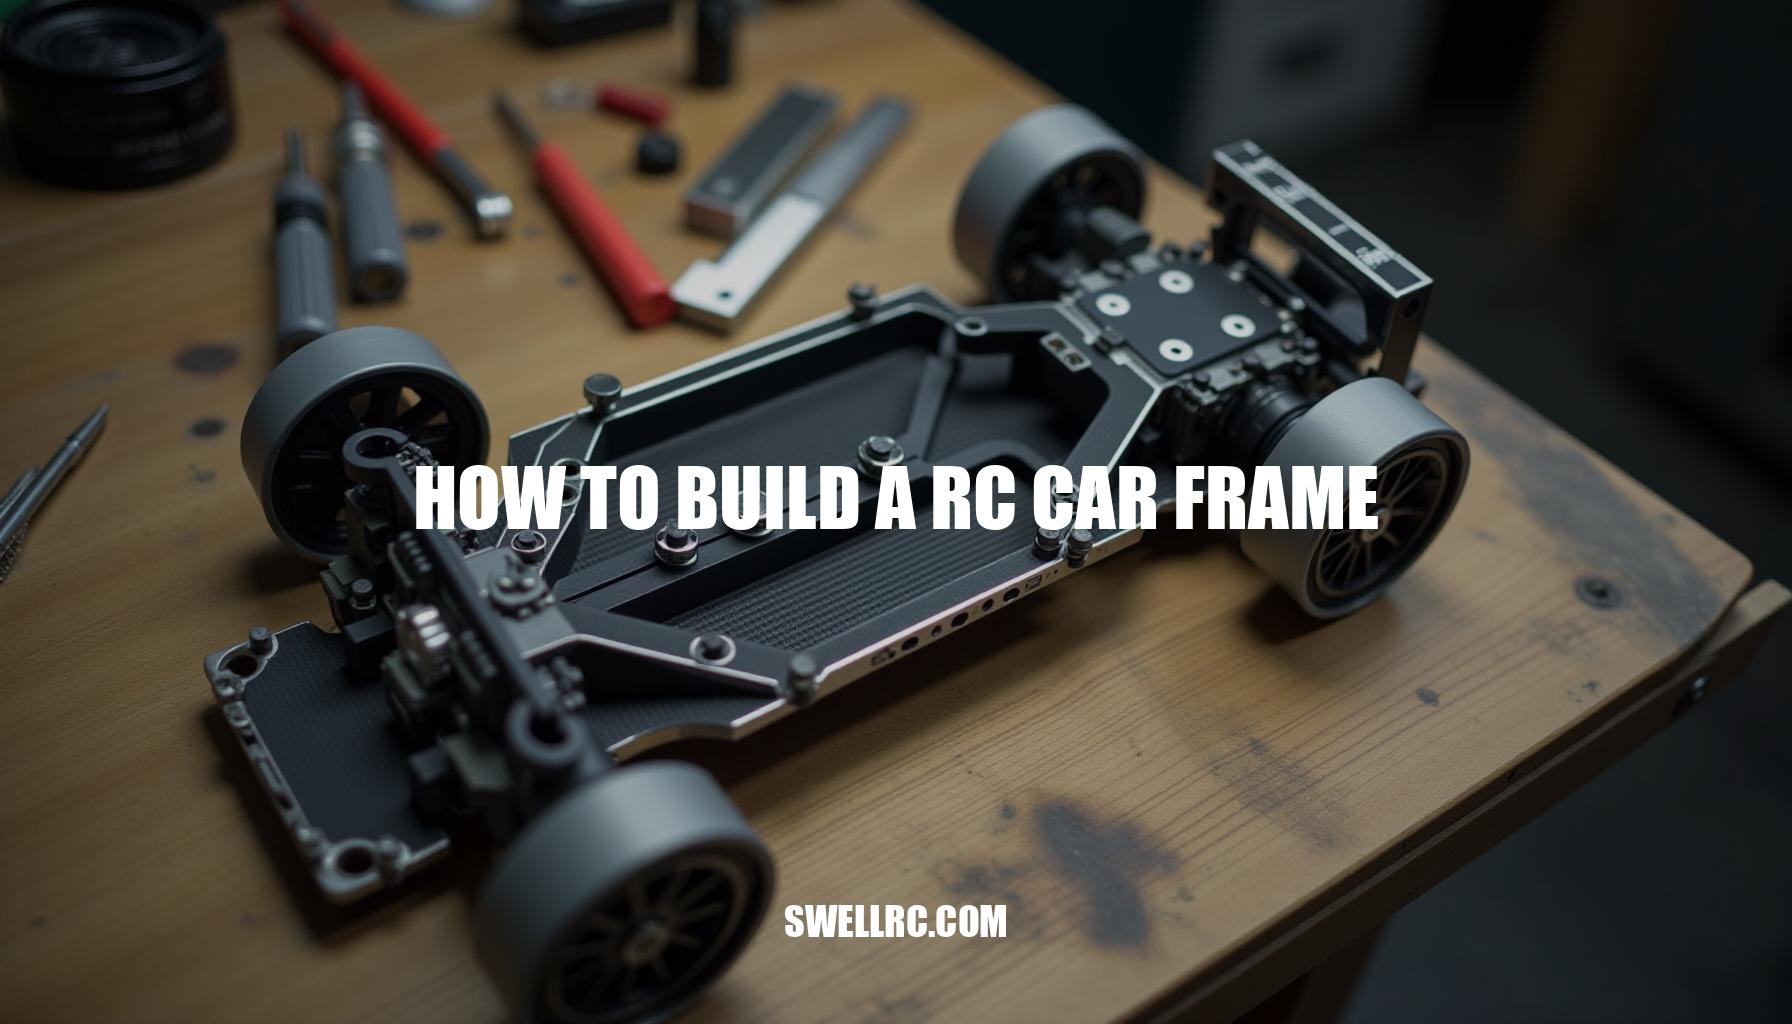
Step-by-Step Guide: How to Build a RC Car Frame
When embarking on how to build a RC car frame, selecting the right tools and materials is paramount for success. You’ll want sheets or rails of 2–3 mm Carbon Fiber (CF) or G10, 2–3 mm 6061/7075 aluminum, or nylon-glass plate as your base materials. The hardware essentials include M3 screws, nylock nuts, countersunk washers, threaded inserts, standoffs, and aluminum angle braces — all critical for ensuring your frame’s structural integrity.
In terms of tools, a metal saw or Dremel, files, a deburring tool, drill with bits ranging from 2.5 to 3.2 mm, a countersink, calipers, square, clamps, masking tape, epoxy or CA glue, threadlocker, and personal protective equipment (PPE) such as gloves and eye and dust protection are necessary for precision and safety during your build.
Building your RC car frame starts with a clear definition of your mission, whether it’s an on-road racer, drift car, basher, crawler, or monster truck. This stage determines your design choices including tire size, motor, battery, and suspension style. Frame alignment is crucial at this point to succeed in performance and durability.
Begin with a sketch and template — draw a full-scale top view that includes wheelbase, servo, ESC, battery, and motor cutouts. Printing and taping this template directly onto your material streamlines your cuts and holes.
Next comes a mockup phase, using cardboard or foamboard to test component fit and ensure steering and suspension clearance. Once satisfied, advance to the rough cut: saw the perimeter while keeping corners generous to avoid cracks. For curves, carefully nibble with a Dremel followed by filing to the line enhances accuracy — a technique often employed in DIY RC aluminum frame builds.
Then, drill pilot holes first, gradually stepping up bit sizes with an important focus on countersinking to prevent stress cracks. Maintain an edge distance of at least twice the hole diameter and countersink slowly to avoid conical cracks.
To maintain structural precision, assemble rails and crossmembers on a flat surface using a simple jig. Measure diagonals diligently to confirm squareness within 0.5 mm, a key metric for frame squareness and performance accuracy. When joining parts, use standoffs and angle braces.
Epoxy bonding is excellent for composites while rivnuts or threaded inserts reinforce plastic components. For aluminum, tap threads where needed to ensure fastener longevity.
Reinforcement is essential—add gussets near shock towers and motor cutouts, and always radius internal corners to reduce stress risers. Incorporate a skid or bash plate especially at landing zones to protect your frame from impacts. After construction, perform a rigidity testing regimen: conduct twist tests (hold the rear and twist front corners) aiming for controlled flex specific to your RC style, drop tests from 10–15 cm to listen for hardware issues, and roll tests to confirm straight free-rolling behavior without veering.
Trial fit all drivetrain, suspension, wheels, and body components, checking ride height, droop, steering lock, and ease of battery changes. Shift components to optimize the center of gravity (CG). Final finishing steps include sealing CF or G10 edges with thin CA, deburring all edges, applying threadlocker, and consistent torque application on fasteners.
Aluminum parts can optionally be anodized or painted for durability and aesthetics.
Common troubleshooting quick fixes include re-squaring rails if the frame pulls left or right, slotting mounting holes slightly, or shimming with washers to correct misalignment. For micro cracks around holes, stop-drill with a tiny bit, add a washer, and wick in thin CA for reinforcement. To address ESC or servo jitter, add foam isolation and reroute wires away from motor leads for noise reduction.
For further inspiration and specialized projects, explore how to fabricate RC monster trucks and ultra-compact chassis conversions such as turning Hot Wheels into RC cars, which showcases accuracy and clever frame layout techniques vital for micro packaging.
Integrating Components: Attaching Electronics and Hardware
When it comes to electronics mounting and hardware assembly, following best practices tailored to your material is essential for reliability and performance. For aluminum components, always tap M3 threads where possible and apply blue threadlocker to secure fasteners. Incorporate nylon washers beneath electronics to ensure vibration isolation and electrical insulation.
With carbon fiber or G10 plates, avoid tapping directly into the material; instead, use through-bolts with washers or threaded inserts to prevent damage. To avert crushing effects, install standoffs and seal any holes with thin CA glue.
For plastic parts, heat-set inserts provide robust threaded connections—just be cautious to prevent overtightening which can compromise the insert’s grip. Moving to the electronics and wiring domain, mount your ESC and receiver on foam tape to dampen vibrations, and arrange them with at least a few centimeters of separation to minimize wiring interference. Crossing power and signal lines at right angles helps reduce noise; additionally, use a ferrite ring on the receiver lead if interference persists.
For battery placement, target the center of gravity by mounting it low along the centerline, with adjustable slots allowing fore-aft tuning. Secure batteries using straps accompanied by a mechanical stop to prevent movement during operation. Servos and motors should be equipped with rubber grommets or O-rings to minimize vibration transfer, while verifying the mesh between gears with a paper slip ensures smooth operation.
If incorporating sensors or an Arduino RC logic board for smart features, plan installation away from heat sources and high-current wiring to reduce electrical noise and heat stress. Utilize vibration-safe standoffs to maintain signal integrity. For guidance on clean, vibration-resistant integration, visit how to make an RC car with Arduino.
Regarding traction and tire selection, choose a tire compound and diameter that complement your chassis weight and power output. Mastering the balance between tread pattern and foam insert tailored to the driving surface is crucial; more insights can be found at how to make RC car tires. Importantly, tune your suspension only after finalizing electronics placement, as changes in mass distribution directly influence spring and damper requirements.
Field note: A rigid frame offers heightened sensitivity to subtle setup adjustments, beneficial for racing precision but less forgiving for bashing. Only add structural braces if frame flex induces instability, not merely for reinforcement.
Testing, Refining, and Common Frame Failures
Ensuring optimal durability and alignment of your RC car chassis starts with a thorough shakedown checklist. To learn how to test RC car frame rigidity effectively, run your vehicle in short bursts while carrying out the following diagnostics:
- Straight-line tracking on a smooth floor—verify there’s no drift.
- Full-lock steering—check for tire or body rub and servo strain.
- Suspension cycle—ensure no binding caused by chassis cutouts.
- Curb bump test—observe for chassis slap or shock tower flex.
- Thermal check—confirm the ESC and motor are not overheating electronics nearby.
- Fastener audit—retorque all fasteners after the first 10 minutes of operation and verify threadlocker application.
- Weight balance—maintain a front/rear ratio within your target, such as 52/48 for on-road or 60/40 for crawlers.
- Vibration and noise inspection—buzzing often signals a loose plate or cracked standoff.
If any issues appear, understanding failure symptoms and likely causes is critical for successful repair and reinforcement:
| Failure Symptom | Likely Cause |
|---|---|
| Pulls under power | Misaligned rails or unequal link lengths; requires re-squaring, shimming, or slotting holes. |
| High-speed oscillation | Excessively flexible chassis; solution includes adding a center brace or thicker plate. |
| Cracks at countersinks | Over-countersunk holes or being too close to edges; using washers and moving holes inward helps. |
| CF/G10 delamination at holes | Dry drilling without backing; re-drilling with backing and wicking thin CA prevents future delamination. |
| Stripped threads in aluminum | Repeated use of self-tapping screws; install helicoils or convert to through-bolts. |
For crash recovery, bent aluminum parts can sometimes be cold-set back into shape; carbon fiber plates require CA wicking and patch plates, while plastics often respond well to epoxy and backing plates. If body repairs are needed after a tumble, refer to comprehensive resources on how to repair RC car body to restore integrity and appearance.
Effective diagnostics combined with strategic reinforcement and attentive repair will enhance your chassis’s longevity and performance.
Remember, every failure mode encountered is a valuable data point; my best-handling chassis emerged after adding a 10 g brace and shifting the battery forward by 5 mm, underscoring the importance of iterative refinement.
Advanced Builds: From Solar to LEGO Frames
Once the fundamentals are yours, it’s time to push boundaries in building an advanced RC chassis. Experiment with innovative materials and techniques to elevate your design. Consider 3D printing frames using nylon or carbon-filled filaments reinforced with metal inserts at high-stress points for durability and lightweight performance.
Explore modular carbon sandwiches, composed of two thin plates separated by alloy standoffs; this method allows tuning of stiffness by varying the brace count for tailored rigidity. For crawler applications, a tube frame or brazed ladder frame is ideal—utilize silver solder or TIG for optimal welding/brazing of steel components to enhance strength and precision.
Don’t forget to integrate alternative power options such as lightweight solar panels mounted on a rigid frame—building a solar RC car merges sustainability with performance; see practical guidance here. For creative concept testing, playful engineering with LEGO RC based frames offers a flexible laboratory environment to prototype and iterate rapidly; detailed instructions can be found here.
Treat each experiment as a valuable learning opportunity—every nontraditional material or layout provides insights that can enhance your main race or trail rig.
Conclusion: Crafting the Perfect Frame
Mastering the frame marks the pivotal moment when your RC car design transitions from mere assemblies to truly personalized creations. You’ve learned to design around loads, select materials intentionally, fabricate with precision, integrate components cleanly, and test your builds like a professional tuner.
Personalization plays a crucial role in chassis mastery. Adjusting elements such as:
- wheelbase
- brace layout
- battery position
- fastener choices
all profoundly influence the feel and performance of your RC car, making each project uniquely yours.
Investing in quality tools and components is non-negotiable. They not only enhance precision but also reduce the need for frequent rebuilds, saving time and resources in the long run.
Embrace iteration and keep the spirit of experimentation alive—today’s cardboard mockup could evolve into tomorrow’s winning chassis. These cycles of trial and improvement are the essence of any successful DIY RC project.
And remember, you’re not alone in this journey. Join the community for more deep-dives, project ideas, and shared experiences. Together, we’re advancing the craft of chassis mastery and RC car design.
Frequently Asked Questions
- What materials are best for building an RC car frame?
For racing, 2–2.5 mm carbon fiber or 7075 aluminum are top picks—carbon is lighter and stiffer, aluminum is tougher and easier to repair. For budget or first builds, G10/FR4 is excellent. Crawlers benefit from ladder frames in aluminum or steel for durability. - How do you design a stable RC car chassis?
Keep the center of gravity low and centered, maintain left/right symmetry within fractions of a millimeter, triangulate crossmembers around big cutouts, and choose a wheelbase/track suited to your surface. Allow clean mounting for electronics and suspension without inducing flex in stressed areas. - Can I build an RC frame using household tools?
Yes. With a hacksaw or Dremel, hand drill, files, calipers, clamps, epoxy/CA, and basic PPE, you can build in aluminum, G10, or plastic. Carbon fiber is also possible with care—use sharp bits, backing boards, dust protection, and finish edges with thin CA. - What’s the difference between aluminum and carbon fiber frames?
Aluminum is ductile, impact‑tolerant, easy to drill/tap, and slightly heavier. Carbon fiber is lighter and much stiffer, giving sharper handling, but it’s brittle at edges and needs washers/inserts. Pick aluminum for rugged builds and carbon for precision and speed. - How do you ensure your RC car frame is lightweight but durable?
Place material only where loads are high: add ribs/gussets at towers and cut relief pockets in low‑stress zones. Use proper edge distance on holes, washers to spread load, and choose the thinnest plate that meets your rigidity target. Keep heavy components low and central. - What’s the easiest RC frame design for beginners?
A flat pan chassis from 2–3 mm G10 or 6061 aluminum with standoffs is the most forgiving. It needs only straight cuts and simple drilling, yet supports clean mounting for motor, battery, and suspension. - How do you attach electronics to a homemade RC car frame?
Use foam tape plus zip ties or screws with rubber washers. Keep ESC and receiver separated, route power and signal lines cleanly, and mount batteries low with secure straps. Add standoffs for PCBs and avoid tapping threads into carbon—use inserts or through‑bolts. - How can I repair a broken RC car frame?
For plastics/G10, epoxy with backing plates works well. For aluminum, minor bends can be cold‑set; stripped threads get inserts or through‑bolts. For carbon, wick thin CA into cracks and add a small patch plate. Replace parts if cracks radiate from multiple holes.