How to Make a Mini Drone with Camera: A Beginner’s DIY Guide
The thrill of a mini drone build is undeniable—transforming a tabletop scattered with motors, wires, and carbon-fiber plates into a soaring custom quadcopter equipped with a live video feed. Whether you’re diving into a DIY drone kit or starting completely from scratch, the process is an exhilarating blend of engineering and creativity. This guide simplifies drone assembly by breaking down each phase, including the essential drone camera setup that enables stunning aerial footage via integrated FPV technology.
Ideal for anyone with an interest in hobby drones, the approach balances affordability and performance to deliver a reliable flyer that you’ll be proud to pilot. By mastering this hands-on project, you’ll gain not only a functioning mini drone but also invaluable insights into the mechanics of flight and real-time video streaming. So, grab your tools and patience for the journey ahead, and let’s bring your custom quadcopter to life.
Section One – Getting the Basics Right: Components and Tools You’ll Need
Building a reliable mini drone with a camera requires assembling the right mini drone parts carefully matched for weight, power, and compatibility. Below is a comprehensive drone components list explaining what each part does, along with essential drone building tools you’ll actually use during assembly.
- Frame (2–3 inch carbon fiber): Acts as the drone’s skeleton, offering stiffness to minimize vibrations while keeping weight low.
- Motors (1103–1204 brushless, 6000–8000 KV): Produce thrust; choosing the right KV depends on your battery voltage and propeller size.
- Propellers (2–3 inch, 2–3 blade): Convert motor torque into lift; more blades increase grip and noise but reduce efficiency slightly.
- AIO Flight Controller + ESCs (F4/F7 with 4-in-1 12–20A ESC): This combo serves as the brain and power delivery system, simplifying wiring and shaving weight.
- LiPo Battery (2S–3S, 300–650 mAh): The energy source; higher voltage and capacity provide more power and flight time but add weight.
- Radio Receiver (ELRS 2.4 GHz, FrSky, FlySky): Receives signals from the transmitter, with ELRS favored for range and low latency.
- Transmitter (handheld radio): Your control center; choose a model that lets you grow your skills.
- VTX (Video Transmitter) (if using analog FPV): Transmits live video feed to goggles or monitor, paired with a compatible camera.
- Camera (analog FPV nano, HD-split nano, tiny action cam): Captures the visual perspective—weight and quality must be balanced.
- Antennas: Enhance reception and video signal clarity for both VTX and receiver.
- Accessories: XT30 connectors, soft mounts, zip ties, double-sided foam tape, heatshrink tubing, blue threadlocker, and spare propellers aid in a durable build.
For assembly, these drone building tools are indispensable:
- Soldering iron with a fine tip, leaded solder and flux, tweezers
- Precision hex drivers, small Phillips screwdriver, flush cutters, wire stripper
- Multimeter for continuity checks to protect your boards
- LiPo charger with balance port support to safely charge your battery
Compatibility is key. Always verify your flight controller’s 5V/9V BEC can handle powering the camera or VTX. Check that motor mount patterns (usually 9×9 or 12×12 mm) match the frame, and the prop diameter clears mounting points.
Additionally, confirm your LiPo battery connectors (XT30 vs JST) align with ESC wiring and your charger.
Choosing the right small camera module greatly affects flight time and video quality. Here’s a quick comparative table:
| Camera Type | Weight (g) | Resolution | Features | Impact on Flight |
|---|---|---|---|---|
| Ultra-light analog FPV nano | 3–5 | ~600–800 TVL | Live view only, budget-friendly | Longest flight time |
| HD-split nano | 10–18 | 1080p/60fps | Onboard recording, balanced quality & weight | Moderate flight time |
| Micro 4K board cam or tiny action cam | 20–27 | Up to 4K/30fps | Best image quality | Heaviest, reduces agility & flight time |
Through extensive testing, I found a sweet spot using a 2.5-inch carbon fiber frame, 1104 7500KV motors powered by a 2S 450–650 mAh LiPo battery, paired with an HD-split nano camera. This setup perfectly balances about eight minutes of flight time with crisp, high-quality footage and responsive controls from the transmitter receiver system.
Section Two – Building the Frame and Attaching Main Components
Turning parts into a solid drone frame assembly requires careful attention to detail to ensure a balanced, smooth flight experience. Begin by dry-fitting the frame components—top and bottom plates, arms, and camera mounts—while planning wire routes meticulously to keep your motor mounting and wiring tidy; this helps manage wire lengths effectively and maintains neat wire management. When attaching motors, use screws of the correct length to avoid scraping motor windings and apply a drop of blue threadlocker to secure them reliably.
Next, install the flight controller (FC) using soft mounts like gummies or rubber washers to minimize gyro noise, and always align the FC’s forward arrow correctly to ensure precise flight control. When routing and soldering motor wires to the ESC pads, tin the pads first, use minimal heat, and keep wires equal in length to maintain balanced power delivery and prevent interference near the propellers. Proper use of soldering tools at this stage is critical for solid, clean connections.
For your receiver, place it away from the video transmitter (VTX) to reduce signal interference, mounting antennas at 90 degrees to maximize reception diversity. The VTX and camera mount should be positioned to allow good airflow and easy access to buttons; applying foam tape can help damp vibrations that might otherwise affect video quality.
Adding the battery pad and strap is essential for achieving the right center of gravity. Position the battery so the drone balances horizontally when held at its midpoint, ensuring stable flight performance. Finally, attach the propellers last, matching clockwise (CW) and counterclockwise (CCW) props to the motor rotation direction.
Always double-check motor spin direction in your software configurator before tightening props to prevent dangerous flip-overs.
Here’s a quick checklist summarizing the drone assembly process:
- Dry-fit frame parts and plan wire paths for short motor leads.
- Mount motors using proper screws and blue threadlocker.
- Soft-mount the FC with rubber washers; align arrow forward.
- Solder motor wires to ESC pads, maintaining equal lengths.
- Position receiver distant from VTX; mount antennas at 90°.
- Install VTX and camera with airflow and vibration damping.
- Fit battery centrally on pad with secure strap for balance.
- Attach propellers last; confirm correct CW/CCW orientation.
Note that sandwich frames offer compactness but challenge wire management due to tight spaces, while whoop-style ducts provide quieter, safer flights indoors. For enthusiasts experimenting with hybrid designs, converting formats like turning a drone into an RC plane can be an exciting adventure; see this guide for inspiration.
Safety tips and common mistakes to avoid:
- Never power a bare FC directly from a full battery without continuity checks to spot shorts.
- Isolate the VTX from carbon fiber parts with tape to prevent grounding issues.
- Keep propellers off during all bench tests to protect your fingers.
- Verify motor directions in software before installing propellers to avoid crashes.
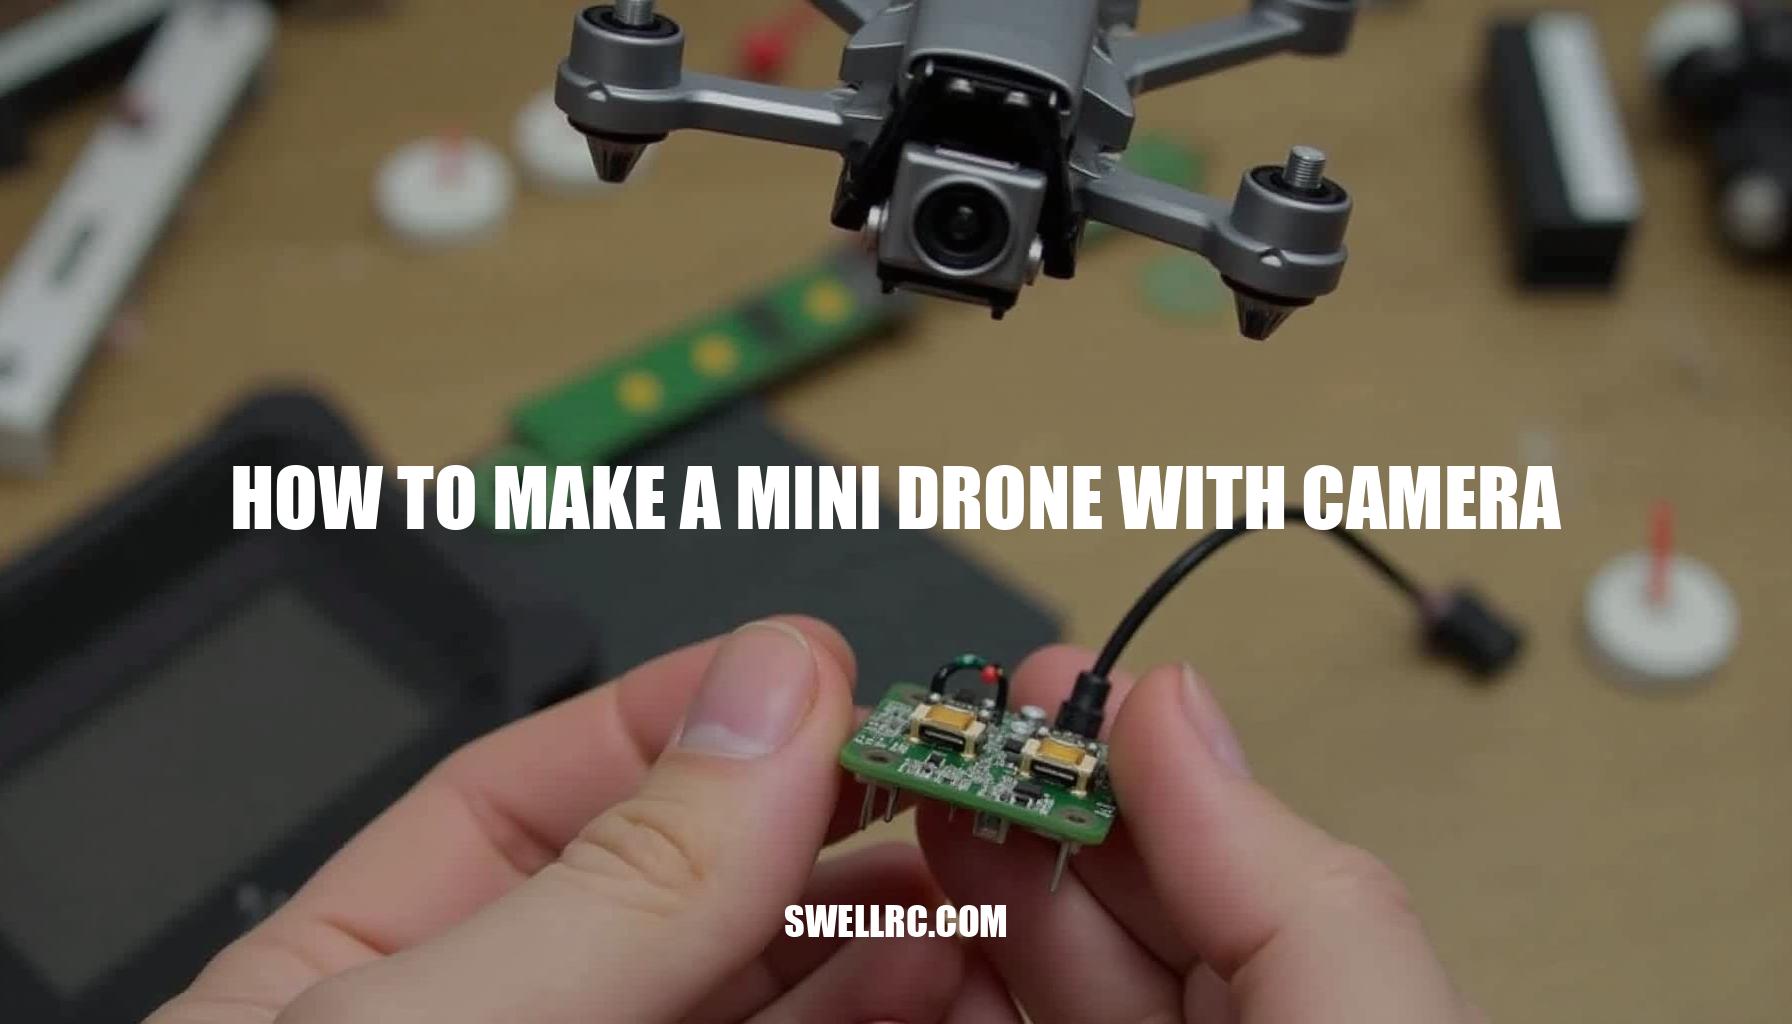
Section Three – Installing and Connecting the Camera System
Choosing the right drone camera setup significantly impacts your flight time, handling, and video quality. To ensure optimal performance, it is vital to mount your camera securely, power it correctly, and set the ideal camera angle. Here’s a step-by-step guide for FPV camera wiring and installation:
- Mounting: Dry-mount your camera inside its cage or side plates, and aim for a 15–25 degree uptilt.
This angle enhances forward flight visuals and overall experience.
- Power: For analog nano FPV cameras, tap into the 5V and GND pads on your flight controller (FC) or use a clean BEC supply. For HD-split boards or micro 4K camera setups, always follow the vendor’s specifications, typically 5V or 9V. Never power the camera directly from the raw battery voltage unless explicitly rated to avoid damage.
- Video Signal: Connect the camera’s video output to the FC’s VIN pad, or directly to the Video Transmitter (VTX) if your FC lacks on-screen display (OSD) capabilities.
Keep this cable short and separated from power lines to minimize interference.
- VTX Wiring: Wire the VTX for 5V or 9V power input, GND, video-in (VI), and the SmartAudio or Tramp telemetry pin if your VTX supports in-goggle control of band settings and power levels.
- Antennas: Utilize a light dipole or a small LHCP antenna for better reception. Secure the antenna with zip tie strain reliefs to prevent damage to solder pads during crashes.
When encountering image issues, consider these troubleshooting tips:
- Rolling lines under throttle: Add a low ESR capacitor (typically 470–1000 µF) across the battery leads and twist the power wires tightly to reduce noise and voltage ripple.
- No OSD: Verify the video path through your FC and confirm that the OSD feature is enabled in your firmware settings.
- Latency or dropouts: Reduce the VTX power when flying in tight spaces to avoid overload, and double-check all antenna connections for integrity.
For inspiration on compact, high-resolution FPV builds, explore the K3 E99 Pro 4K mini drone helicopter page. This example shows how manufacturers package micro 4K camera systems effectively.
The first time I saw the live feed on my goggles, it truly brought my build to life — making all the soldering on that video pad worthwhile!
Section Four – Programming and Calibrating the Flight Controller
The software setup transforms your hardware into a stable aircraft, essential for a smooth flying experience. The process begins by flashing the firmware, choosing between Betaflight—ideal for freestyle and racing minis with its beginner-friendly presets—and iNav, which brings GPS navigation and Return to Home features for more advanced pilots. Updating your ESC protocol is equally crucial: use DSHOT300 or 600 where supported, and flash BLHeli_S or Bluejay firmware to improve throttle response and enable RPM filtering.
Next, focus on the flight controller setup. Correct orientation means aligning the FC board so the on-screen arrow accurately reflects the drone’s forward direction. Following this, configure the ELRS receiver by binding your radio, selecting the proper protocol such as CRSF, and mapping your transmitter channels.
Calibrate throttle endpoints by ensuring sticks read correctly between 1000–1500–2000 µs, applying deadband if necessary to prevent jitter.
Assign flight modes like arming, angle/horizon/acro modes, beeper activation, and turtle mode per your preferences. For precise control, place the drone on a perfectly flat surface to perform gyro calibration and accelerometer leveling. Adjust gyro low-pass filters if needed to reduce noise.
Finally, start tuning your PID and rates. Use presets matched to your prop and motor class but be prepared to tweak settings. What truly made a difference for me was realizing that mid-throttle oscillations were not from PID issues but from filter settings.
Enabling RPM filtering on the ESC and lowering the master multiplier smoothed flight performance immensely.
| Software | Purpose | Difficulty Level |
|---|---|---|
| Betaflight | Freestyle/racing firmware with beginner-friendly presets | Beginner |
| iNav | GPS navigation and Return to Home features | Intermediate |
| BLHeliSuite / Bluejay | ESC configuration for optimal throttle response and RPM filtering | Intermediate |
| OpenTX / EdgeTX Companion | Radio transmitter setup and backup | Beginner to Advanced |
Section Five – First Flight and Fine-Tuning
Embarking on your first flight demands patience and attention to RC drone safety. Short, controlled hover tests teach you more than extended flights, allowing you to identify and resolve issues early. Begin with a pre-flight safety checklist to ensure everything is in order:
- Props off when performing arming tests; attach props only outdoors or in a safe, clear space.
- Use a freshly charged, undamaged LiPo battery with secure straps and adequate padding.
- Confirm that video and radio links are solid, and set the VTX power legally for your operating area.
- Test the arm switch, beeper, and disarm reflex meticulously.
For your first hover routine, operate in Angle mode within an open, low-wind environment.
Lift the drone about one meter quickly to avoid ground effect, then hold position. Observe any drift direction; if detected, land, then recalibrate the accelerometer or adjust trims on your radio. Always check motor temperatures—motors hot to the touch might indicate overly aggressive propellers or an excessively heavy tune.
Common beginner challenges include wobble or oscillations, yaw drift, and short flight time.
To fix wobble, slightly reduce the P and D values in your PID tuning, add filtering if available, or switch to lower-pitch propellers. If yaw drift occurs, re-run accelerometer and stick calibrations, inspect for twisted frames, and tighten any loose screws. For short flight time, consider a slightly higher-capacity battery or lighten your build.
If this is your initial experience with RC drones, warming up with foundational flight guides can be invaluable.
For instance, explore mini drone beginner tutorials, broader RC drone piloting skills, or brand-specific instructions such as how to fly a DJI drone to build confidence.
The exhilaration of the first steady hover is unforgettable. From there, attempt small S-curves and gentle yaw turns, and gradually move into fine-tuning your PID settings and rates. Adjust for your preferred flight style—snappier controls for acro flying or softer handling for cinematic lines.
These beginner drone tips will set a strong foundation for your RC drone piloting journey.
Section Six – Enhancing Your Drone: Customization and Upgrades
Once your mini drone takes flight, make it yours through thoughtful drone customization and upgrades. Every add-on trades weight for enhanced capability, so it’s important to upgrade with intention to maintain optimal performance.
- LED lights and buzzer: Enhance visibility and facilitate lost-model recovery with minimal weight addition, making these lightweight accessories essential for any mini drone.
- Camera upgrade: Transition to a nano HD-split camera for onboard recording if you initially started with an analog setup. This offers clearer footage and improved video quality without significant extra weight.
- Propeller changes: Opt for lower pitch props to achieve efficient cruising, or tri-blade props for better grip and control during flight maneuvers.
- Battery optimization: Experiment with 2S batteries for smoother, longer flights, or 3S batteries if your motors and ESCs support higher power for a punchier performance.
- GPS module and compass: These enable basic navigation features in iNav but add wiring complexity and approximately 5–10 grams of weight, so consider if the added functionality aligns with your flight goals.
- VTX and antenna upgrade: Upgrade to cleaner, more durable antennas to improve signal quality while keeping the setup light enough for sustained flight times.
For enthusiasts curious about crossovers and more advanced builds, explore different design mechanics such as helicopter-style rotor dynamics in how to make a RC helicopter, building compatible transmitters in how to make RC helicopter remote, or gaining fixed-wing perspectives in RC airplane with camera.
Personally, I added a tiny LED matrix to my mini drone, instantly giving the build personality without significantly affecting flight time. Strategic drone customization like this balances innovation with reliable performance.
Conclusion – From Hobby to Mastery: What Building Teaches You
You’ve just embarked on an exciting journey to DIY drone success by learning how to choose parts, assemble a mini airframe, wire a camera, program the flight controller, and tune for smooth, confident flight. Along the way, you not only honed your technical skills but also practiced patience, problem-solving, and experienced the joy of turning sketches into a flying reality.
From this foundation, the path to drone mastery is wide open. Whether you aim for smoother aerial photography, longer flights, or experimenting with new airframes entirely, continuous learning is key. Consider these tips to advance your skills:
- Chase smoother footage by refining your camera setup and stabilization techniques.
- Extend flight times through optimized battery management and efficient power usage.
- Explore different airframes to find what suits your flying style and needs.
- Keep detailed notes of your builds and tweaks to track progress and avoid repeating mistakes.
- Lean on the RC community—sharing experiences and advice accelerates growth and innovation.
Every failed solder and wobbly hover is a step toward mastery. After countless late nights and a few propeller nicks, I can confidently say the journey was absolutely worth it. Embrace the challenges and celebrate the victories—the world of DIY drones offers endless possibilities for those who persist in continuous learning.
I can’t wait to see what you build next!
Frequently Asked Questions
- What parts are needed to make a mini drone?
You need a 2–3 inch frame, 4 brushless motors (1103–1204 class), 4-in-1 ESC (12–20A) with an F4/F7 flight controller, 2–3 inch props, a 2S–3S LiPo (300–650 mAh), a radio receiver (e.g., ELRS), a transmitter (your radio), a camera (analog nano or nano HD-split), a VTX for analog video, antennas, and build essentials like connectors, wires, and a LiPo charger. - How can I add a camera to my drone?
Mount a lightweight nano camera securely at a 15–25° angle, power it from a clean 5V/9V BEC, route the video signal to the FC’s video-in (or straight to the VTX), and secure antennas with strain relief. For HD-split cameras, wire both the lens board and DVR board per the diagram and confirm OSD and recording before flight. - How much does it cost to build a DIY mini drone?
Typical parts for an FPV-capable mini run about $120–$250 (analog) or $200–$400 (nano HD-split). A decent transmitter can add $60–$200, a charger $20–$40, and spares (props, batteries) $20–$50. Costs vary with camera choice and whether you already own a radio and charger. - Can beginners build their own mini drone?
Yes. Start with a 2.5-inch frame, an AIO FC/ESC board, and pre-set firmware profiles. Follow a step-by-step guide, use a multimeter for continuity checks, and test with props off. Kits simplify compatibility and reduce soldering, making first builds much more approachable. - How do I control or program a homemade mini drone?
Flash Betaflight or iNav to the flight controller, bind the receiver to your radio (ELRS/FrSky/FlySky), calibrate endpoints and sensors, and set flight modes to Angle/Horizon/Acro. Tune PIDs or use presets, then adjust rates for how fast it responds to stick inputs. - How long will a homemade mini drone fly?
Most 2–3 inch minis fly about 4–9 minutes depending on battery size (300–650 mAh), motor KV, prop choice, and camera weight. Analog FPV builds usually fly longer than nano HD due to lower mass. - What’s the best small camera for drones?
There’s no single best—match camera to mission. For longest flights, choose an ultra-light analog nano FPV cam. For recording, a nano HD-split (1080p/60) balances quality and weight. True 4K micro cams look fantastic but add 20–27 g, which can noticeably reduce agility and flight time on mini builds.