How to Make a RC Monster Truck from Scratch
I still remember the first time my homemade suspension finally absorbed a nasty curb jump without breaking—a rush of pride and excitement that no off-the-shelf RC could match. Crafting an RC monster truck from scratch isn’t just about assembling parts; it’s about embracing the freedom to innovate and the thrill of overcoming every mechanical hiccup firsthand. Whether you’re diving into DIY RC projects for the first time or you’re a seasoned tinkerer eager to level up, this guide walks you through every step: from building a robust chassis to dialing in suspension, choosing the right motors and remote control systems, selecting tires, and fine-tuning performance.
Tackling one RC truck part at a time makes what seems complex completely doable. Trust me, with patience and practice, mastering remote control vehicle building is well within reach. And for everyone from novices to veteran maker-engineers, SwellRC has been my go-to knowledge base and community hub—packed with resources on remote control monster trucks and beyond.
Ready to get your hands dirty and your truck roaring? Let’s dive in!
Essential Tools and Materials for Your Build
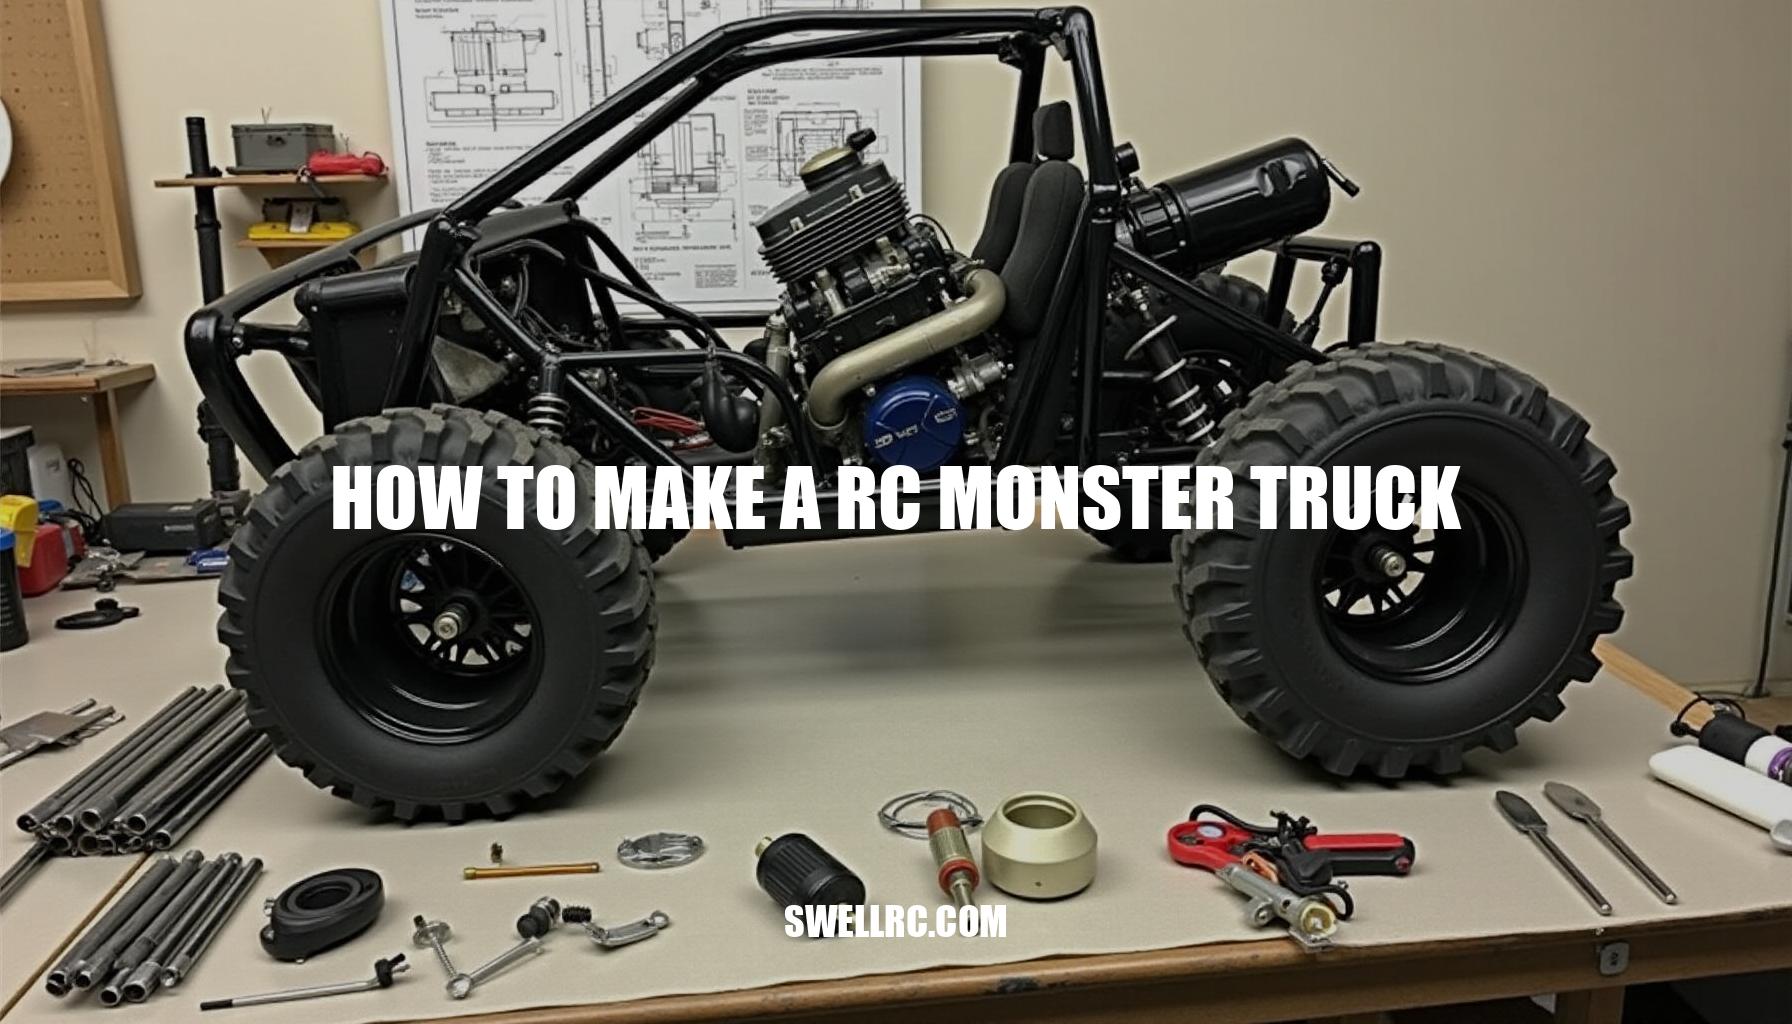
Before you turn a single screw on your off-road RC truck build, being fully prepared with the right components and tools is key to success. Off-road durability demands materials that can withstand impacts and vibrations, like 6061 or 7075 aluminum for frames, or G10/FR4 for electronic boards. For prototyping, hardwood or plywood chassis parts offer a simple, workable solution.
Equally important are high-quality fasteners, bearings, and drivetrain parts—differentials, shafts, and gears—that maintain performance under torque and stress. Your electric motors (brushed or brushless) and multi-cell LiPo battery packs (ranging from 2S to 4S) need to be carefully matched with ESC and cooling headroom to ensure current and temperature ratings keep everything running safely. Reliable servo controls, preferably metal gear high-torque steering servos, paired with a stable 2.4GHz transmitter and receiver system, guarantee responsive handling even on rough terrain.
To streamline your build and minimize setbacks, equip your workspace with specialized tools like digital calipers for precise measurements, quality hex drivers designed for RC truck parts, and threadlocker to keep fasteners secure. Heat-shrink tubing and good soldering equipment are indispensable for durable wiring connections using silicone wire and proper connectors. Safety gear is a must—use an LiPo safe charging bag and always wear eye protection when soldering or assembling parts under tension.
To stay organized, label your parts bins and pre-measure standoffs and spacers before assembly starts. This little preparation can save hours of rework and frustration. For a deep dive on constructing your frame using the best materials for RC car chassis, check out how to build an RC car frame.
| Component | Recommended Type | Purpose |
|---|---|---|
| Frame Materials | 6061/7075 Aluminum, G10/FR4, Hardwood/Plywood (prototype) | Structural strength and durability for chassis supporting all components |
| Fasteners | High-grade steel or titanium bolts, locknuts, washers | Secure assembly resistant to vibration and impacts |
| Bearings | Sealed ball bearings (steel or ceramic) | Reduce friction in rotating parts for smoother drivetrain operation |
| Drivetrain | Diffs, shafts, gears (hardened steel or alloy) | Transmit torque efficiently under varying loads |
| Wheels and Tires | Rubber tires with appropriate tread patterns on durable rims | Maximize off-road traction and shock absorption |
| Shocks/Springs | Oil-filled adjustable shocks with quality springs | Dampen impacts and maintain vehicle stability |
| Steering Servo | Metal gear, high-torque servo | Precise and reliable steering control in demanding conditions |
| Motor | Brushed or brushless electric motor (matched to ESC and battery) | Provide propulsion with appropriate power and efficiency |
| ESC (Electronic Speed Controller) | Compatible ESC with sufficient current rating and thermal protection | Control motor speed and protect electronics under load |
| Battery | LiPo 2S–4S battery pack with high C-rating | Supply power with adequate current and voltage for performance |
| Charger | LiPo-compatible balance charger | Safely and efficiently recharge battery packs |
| Radio System | 2.4GHz transmitter and receiver | Reliable, interference-free communication between controller and vehicle |
| Wiring | Silicone insulated wire, quality connectors | Flexible, durable electrical connections |
| Soldering Tools | Soldering iron, solder, heat-shrink tubing | Create solid electrical joints and insulate connections |
| Adhesives and Threadlocker | RC-grade glue, medium-strength threadlocker | Secure non-threaded parts and prevent fastener loosening |
| Tools | Hex drivers, digital calipers, multimeter | Precision assembly, measurement, and diagnostics |
| Safety Gear | LiPo charge bag, eye protection | Protect against battery hazards and debris |
Step-by-Step Guide: Building the Frame and Suspension
Embarking on the assembly of your RC chassis is a tactile journey that begins with a well-thought-out plan. First, plan your layout: graph out your wheelbase, track width, ground clearance, and weight targets. Sketch both plate and rail chassis variants, marking precise mounting points for each component.
As you handle your sketches and components, feel the anticipation as parts begin to take shape.
Next, cut and drill the chassis material with care. Run your fingers along freshly cut edges, deburring meticulously to avoid stress risers that could weaken your frame. Add crossmembers for stiffness, then dry-fit the standoffs; the slight resistance and subtle alignment shifts under your touch confirm the symmetry and balance of your build.
- Choose your suspension type: independent double wishbone for rafts of precise handling, or a 4-link or solid axle for that classic monster truck articulation.
Contemplate ride height and travel, letting your hands simulate the movement and range you aim to achieve.
- Fabricate arms and links: measure and match lengths exactly, ensuring parallel geometry. Feel the robust metal ball ends snap into place—durability you can trust.
- Mount shocks and springs: begin with mid-weight oil and progressive springs. As you compress them by hand, set sag carefully to 25–35% of total travel—this balance feels just right under your fingertips.
- Install steering knuckles and hubs: move them gently, verifying zero-bind movement.
Applying minor shims to bearings as needed, you’ll hear the satisfying click that signifies smooth operation.
- Add differentials and gearbox: engage gears by hand, confirming smooth mesh and proper lubrication. Tune diff action to your terrain—locking or loosening according to your preference.
- Align and square: verify camber, caster, and toe angles. Feel the level chassis—especially with the battery installed—to ensure balanced weight distribution.
- Field test and iterate: as you drive, adjust spring rate, oil viscosity, and link geometry.
Manual tweaks reduce bottoming, lessen chassis twist, and minimize traction roll—amounting to that gratifying ‘perfect setup’ feel.
Throughout this hands-on process, remember key tips from the rc truck suspension guide: balance durability with just enough flex at mounting points to absorb hard landings, place heavy components low and centered to enhance stability, and always fine-tune your RC frame design considering weight distribution, differential setup, ground clearance, and of course, camber, caster, toe angles. Each satisfied click and snug fit is a testament to your methodical craftsmanship, laying the foundation for exceptional performance on any terrain.
Electronics and Circuit Setup
Wiring your RC car’s electronics might seem like a daunting puzzle at first, but with just a few core connections and best practices, you’ll have it humming smoothly in no time. At its heart, the wiring links your battery to the Electronic Speed Controller (ESC), which drives the motor. The ESC’s BEC (Battery Eliminator Circuit) provides power to your receiver, which in turn controls the servo steering.
Don’t forget your power switch for easy on/off control, and if your setup demands, an optional external BEC can provide cleaner, stable voltage to sensitive electronics.
Before powering up, you’ll want to handle receiver binding—pairing your 2.4GHz radio system with the receiver—then carefully set a failsafe to protect your car if signal is lost. It’s important to check channel directions and endpoints to ensure your steering and throttle respond correctly, avoiding surprises on the track.
Wire management isn’t just about looks; it’s key to reliability. Twisting signal leads reduces electrical noise, while applying strain relief minimizes stress on connectors. Heat-shrink tubing adds durable insulation, and choosing proper connectors—like XT60, Deans, or IC5—matches current demands safely and securely.
Your testing workflow should begin with continuity checks using a multimeter to verify all connections before you ever plug in power. Next, perform a bench test with the wheels off the ground—this way you can confirm the motor runs smoothly, without cogging or brownouts, ensuring everything is dialed in before hitting the road.
Safety precautions are paramount. Handle LiPo batteries with care: store them at storage voltage, charge with a balance charger, and consider fuses or inline breakers to protect your circuits. Never short pack terminals or pinch wires, as these mistakes can lead to dangerous failures.
For a clear roadmap, consider consulting a simplified wiring diagram illustrating the battery, ESC, motor, receiver, servo, and BEC paths. Interested in expanding your skills further? Check out our guide on how to make a RC car circuit board to dive deep into building your own custom RC electronics.
Tire Selection and Grip Optimization
When chasing peak performance in RC off-road handling, tire choices are everything. The compound directly impacts tire traction: soft rubber grips like a magnet on loose dirt but wears fast, medium compounds balance grip and longevity, while hard compounds shine in rough terrain yet sacrifice bite. Foam inserts further refine responsiveness—single-stage inserts offer consistent stiffness, whereas dual-stage inserts provide a plush initial absorption with a firmer secondary rebound, improving control over rocks and roots.
Tread design is another critical factor.
Paddle tires excel in deep sand, throwing material effectively for forward thrust, while chevron treads deliver balanced grip and tracking in mud and loose gravel. Lugged treads bite into hard-packed dirt, and all-terrain designs offer versatility across varied surfaces.
Wheel choice compounds the effect. Glue-on wheels, traditional but vulnerable to failures under torque, contrast with beadlock wheels that clamp the tire securely, simplifying quick tire swaps—essential when fine-tuning during a field test, like switching compounds on gravel and instantly shaving meters off braking distance.
For the true performance enthusiast, DIY molding and trimming enable custom tire profiles tailored to specific tracks.
Mastering venting techniques controls ballooning, maintaining tire shape and contact patch for consistent feedback.
Here’s a handy comparison table summarizing these elements:
| Tire Type | Terrain | Grip Level | Durability |
|---|---|---|---|
| Soft Compound Paddle | Deep Sand | High | Low |
| Medium Compound Chevron | Mud, Loose Gravel | Medium-High | Medium |
| Hard Compound Lugged | Rocky, Hard-Packed | Medium | High |
| All-Terrain Medium with Dual-Stage Foam | Mixed Surfaces | Medium | Medium |
Integrating tire compounds, tread design, and foam inserts with beadlock wheels not only optimizes tire traction but also streamlines maintenance and customization workflows. For those eager to dive deeper into the craft, our comprehensive guide on how to make RC car tires reveals pro tips for enhancing grip through personalized tire construction.
Adding Power: Motors, Batteries, and Speed Control
When it comes to perfecting the balance between torque and top speed in monster trucks, my approach has been all about iteration and careful tuning across multiple components. Starting with motor selection, I prefer a torque-leaning KV brushless motor over a brushed alternative. While brushed motors offer simplicity and lower cost, brushless motors excel in efficiency and power delivery, which is crucial for off-road performance.
A lower KV torque motor ensures the grunt needed for aggressive terrain without sacrificing longevity.
Pairing the motor with the right ESC is equally critical. I look for ESCs providing ample current headroom and programmable settings—features like adjustable brake strength, punch control, and timing are game changers in high-speed RC tuning. These controls allow me to fine-tune speed control and responsiveness precisely, adapting to different track conditions and driving styles.
Battery selection is another key factor. Choosing between 2S, 3S, and 4S LiPo batteries involves a tradeoff between voltage, runtime, and thermal load. Higher voltage packs (like 4S) deliver more speed but generate more heat and can reduce component lifespan if not managed properly.
Meanwhile, C-rating and capacity balance power output with runtime. I often experiment with various battery packs to find the sweet spot that maximizes performance without overheating.
The drivetrain doesn’t get overlooked either. Adjusting pinion and spur gear ratios tunes the leverage and top speed, while metal gears add durability to withstand the added torque. Proper slipper clutch calibration smooths power delivery and protects the drivetrain from shocks during hard acceleration or jumps.
Thermal management rounds out the setup. I vigilantly monitor motor and ESC temperatures during runs, ready to gear down if temps exceed safe limits—preventing premature failure is paramount. Though high-speed capability is tempting, I prioritize control and durability for off-road conditions, ensuring my trucks handle unpredictable terrain without thermal or mechanical issues.
For those interested in pushing top-end speed further, how to make a high-speed RC car offers excellent insights into advanced speed setup strategies. Still, in my experience, dialing in torque motors, speed control, ESC, gear ratio, battery packs, and thermal management holistically is the key to a balanced, beastly off-road monster truck.
Integrating Advanced Controls (Arduino & Bluetooth Options)
Imagine your trusty RC truck waking up with a spark of intelligence, its steering gliding as smoothly as a skater on ice, and its throttle responding like a finely tuned symphony. This leap from mechanical to “alive” often starts with an Arduino RC system at its heart. Whether you read the PWM signals straight from the receiver or choose the bold route of fully replacing it, the Arduino steps in as the brain, generating clean servo and ESC PWM signals that dance to your custom commands.
With a sprinkle of code magic, you can layer in throttle curves that sculpt power delivery into silky waves, and steering expo that tempers the sensitivity for precise navigation. Different traction modes pop up as selectable personalities for your truck, adapting to terrain with a playful wink.
On another channel, a Bluetooth path allows your phone to become a wizard’s wand, tweaking modes or streaming telemetry right into your hand. Yet, the 2.4GHz transmitter remains the loyal lead, ensuring rock-solid reliability with minimal latency and mighty range — no dropped signals breaking the spell.
Safety is the unsung hero here. Implements like failsafe states jump in if the signal goes dark, while watchdog timers and brownout handlers stand guard over power quirks. Noise filtering keeps everything running smooth, preventing jittery commands from turning into chaos.
Picture the core logic like this: the Arduino reads the input PWM from the receiver or Bluetooth module, then maps those raw pulses into meaningful control signals. Smoothing algorithms gently ease sudden changes, while expo curves bend the response to perfection before dispatching tidy PWM outputs to the servo and ESC.
- Check out how to make an RC car with Arduino for an in-depth dive into the Arduino path.
- Explore how to make Bluetooth RC car to harness mobile control.
So, by blending Arduino RC system mastery with thoughtful servo controls, seamless Bluetooth control, and trusty 2.4GHz transmitter reliability, your truck doesn’t just react—it thinks, adapts, and truly comes alive on every twist and throttle.
Creative Customizations and Experimental Builds
Embrace the spirit of playful experimentation as you innovate your RC project, blending creativity with precision engineering. Consider building LEGO-based prototypes to validate the geometry and spatial arrangement of components before committing to permanent builds. Drawing inspiration from amphibious RC concepts used in RC boat techniques can open exciting doors for hybrid models that maneuver on land and water.
Explore modular chassis designs featuring interchangeable body shells that not only allow easy swaps but also improve serviceability. Throughout these creative mods, keep a keen engineer’s eye on crucial factors like weight budgeting, center of gravity placement, and durable mounting points to ensure every iteration is both fun and functionally sound.
Here are three customizable ideas to kickstart your prototyping journey:
- LED lighting mods: Integrate LED lighting with a small buck converter for crisp, efficient illumination that enhances your model’s aesthetics and visibility.
- Adjustable ride height: Modify shock absorber mounting positions or preload collars to fine-tune your vehicle’s ride height and handling characteristics.
- 3D-printed RC body shells: Create lightweight, customized shells with reinforced hardpoints to balance durability and weight savings, perfect for modular swaps.
Troubleshooting and Fine-Tuning Performance
Tuning your RC vehicle is a journey filled with learning curves and rewarding discoveries. Over time, I’ve faced and resolved a variety of challenges, and I hope sharing these insights helps you avoid some headaches. Remember, tuning isn’t just a chore—it’s part of the fun that enhances your connection with the machine.
Below is a handy table summarizing common issues you might encounter, likely causes, and tried-and-true solutions. This snapshot gives you a quicker troubleshooting workflow to handle everything from vibration problems to connectivity issues and uneven weight distribution.
| Problem | Likely Cause | Solution |
|---|---|---|
| Pulls to one side | Uneven weight distribution or misaligned wheels | Balance weight evenly; realign wheels precisely |
| Drivetrain binding | Misaligned gears or insufficient lubrication | Adjust gear mesh; properly oil drivetrain parts |
| Motor cogging | Underpowered ESC settings or improper motor timing | Reset ESC endpoints; fine-tune motor timing |
| Brownouts | Inadequate power supply or battery drain | Use higher capacity battery; ensure solid connections |
| Short radio range | Interference or antenna issues | Check and reposition antenna; re-bind radio |
| Overheating | Poor ventilation or excessive load | Improve airflow; adjust gear ratios; rest motor periodically |
| Severe vibration | Imbalanced tires or loose components | Balance tires; tighten all screws; inspect components |
| Tire ballooning | Overinflated tires or improper foam inserts | Adjust foam inserts; avoid overinflation |
| Servo jitter | Electrical noise or out-of-calibration servo horn | Re-center servo horn; shield wiring; use ferrite beads |
| Diff clicking | Insufficient lubrication or worn gears | Shim diffs; re-oil with correct weight fluid; replace worn parts |
| Suspension bottoming | Inadequate shock oil or spring rate too soft | Re-oil shocks with correct weight; upgrade springs |
| Traction roll | Uneven suspension settings or weight imbalance | Tune suspension stiffness; redistribute weight |
| Uneven weight distribution | Poor component placement | Redistribute electronics and battery for balance |
After addressing these concerns, follow these quick calibration steps to keep your setup dialed in:
- Re-center the servo horn to ensure smooth control response.
- Reset ESC endpoints to match current motor capabilities.
- Re-bind your radio system to troubleshoot connectivity issues.
- Balance tires to minimize vibration problems during runs.
- Shim diffs carefully to fine-tune gear mesh and durability adjustments.
- Re-oil shocks using the correct weight oil to achieve optimal suspension performance.
Patience is key: adopt an iterative testing approach by changing one variable at a time and logging your results. This careful tuning workflow helps isolate effects and gradually hones your machine’s performance. Embrace the process, and you’ll find each improvement a satisfying testament to your hands-on experience.
Conclusion: The Joy of DIY Mastery
Embarking on your DIY RC projects journey brings a unique satisfaction that only comes from turning individual parts into a roaring, trail-ready machine. The hands-on experience of RC vehicle building not only fuels your passion but also sharpens your skills with every assembled component and tested run.
But the adventure doesn’t end here. Embrace a mindset of continuous improvement by incorporating smarter remote control systems, experimenting with stronger drivetrains, and exploring innovative tire compounds.
Each upgrade opens the door to new performance thresholds and customization possibilities, encouraging a true maker mindset.
Feel free to revisit the earlier linked guides in this series for deeper dives into specific techniques and to inspire your next projects. These resources are designed to support your growth and creativity as you refine your builds.
So why wait? Gather your parts, clear a workspace, and jump into your first prototype today.
Your trail-ready masterpiece awaits—let your ingenuity take the wheel!
Frequently Asked Questions
- What materials do I need to make a RC monster truck from scratch?
A solid starter kit includes: chassis material (aluminum plate/rails, G10/FR4, or hardwood/plywood for prototyping), metal hardware, bearings, drivetrain (differentials, shafts, pinion/spur gears), wheels and off-road tires with foams, oil-filled shocks and springs, a high-torque metal-gear servo, brushed or brushless motor with a suitably rated ESC, a 2.4GHz transmitter/receiver, LiPo battery and balance charger, silicone wire/connectors, soldering gear, threadlocker, hex drivers, calipers, and safety items like a LiPo bag and eye protection. - How can I build an RC truck frame strong enough for off-road driving?
Use stiff plate or boxed rails with crossmembers and triangulation, avoid sharp internal corners, and reinforce suspension mount zones. Choose 3–5 mm aluminum or G10/FR4 plates for strength-to-weight, and verify symmetry by dry-fitting. Keep heavy components low and centered, use threadlocker on metal-to-metal fasteners, and add skid plates where impacts are likely. - What type of motor and battery work best for monster trucks?
For torque and control, a low‑KV brushless setup (about 1200–2200KV) on 2S–3S LiPo is a great starting point; pair with an ESC that has ample current headroom. Alternatively, a high‑torque 550 brushed motor works well for budget builds. Choose 3000–5000 mAh packs with an appropriate C‑rating, and size gearing to keep temperatures in a safe range. - How do I make custom RC car tires at home?
Create or 3D-print a two-part mold and cast tires using silicone or urethane rubber, then trim and fit foam inserts. You can also cut, splice, and re-glue tread segments to tune patterns. Beadlock wheels simplify installation and testing of different compounds and foams without messy re-gluing. - Can I build a RC monster truck with Arduino?
Yes. An Arduino can read receiver PWM signals to apply custom logic (expo, throttle curves) or replace the receiver entirely when paired with Bluetooth or other inputs. Ensure a stable BEC supply, implement failsafe states, and filter noise for reliable servo and ESC control. - What is the best suspension setup for RC off-road vehicles?
Long-travel, oil-filled shocks with progressive springs are the foundation. For monster trucks, consider 4‑link solid axles for articulation or independent double wishbones for precise handling. Tune oil weight (e.g., 30–50 wt), spring rates, and sway bars to balance grip and roll control on your terrain. - How do I control my RC truck using Bluetooth?
Use a Bluetooth module (e.g., HC‑05/HC‑06) with an Arduino to translate phone inputs into servo/ESC PWM signals. Keep a 2.4GHz radio as the primary control for range and reliability, using Bluetooth for telemetry or mode switching to minimize latency risks. - How fast can a DIY RC monster truck go?
With a brushless system on 3S and appropriate gearing, 25–40 mph (40–65 km/h) is realistic while retaining off-road control. Higher speeds are possible with more voltage and taller gearing, but traction, heat, and durability become limiting factors.