Step-by-Step Guide: How to Connect RC Speed Controller
Ah, the thrill of controlling an RC device, be it airborne or terrestrial! But that exhilarating command, friends, comes from a gadget often overlooked – the RC speed controller. Acting as the heart that pumps life into our RC devices, it’s a little magic box that swiftly interprets your command into an accurate motor action. Now, according to HobbyKing.com, a leader in the RC hobby kingdom, there’s indeed quite a varied range of these speed controllers available. From flying gliders to racing cars, they’re as diverse as the world of RC itself. The key here is to opt for the right one, the one that best suits your device and your ambition to rule the RC roost. Think of it as matching the right jigsaw piece in a complex puzzle. Get it right, and voila! Your device operates at peak performance. And if you get it wrong? Let’s say you’re more likely to hit a roadblock than the finish line. So, let’s navigate this RC road together, shall we?
Choosing the Right ‘Brain’ for Your RC Device
Let’s think of the RC speed controller as the ‘brain’ of your RC device. Just like your brain transmits signals to different parts of your body, the RC controller sends commands to the device, controlling its movement and speed. There are two main types of speed controllers: brushed and brushless. The brushed ones, as the name suggests, use brushes to deliver current. They are budget-friendly, but wear out more quickly due to the mechanical wear and tear. Brushless ones, on the other hand, utilize magnets and are more efficient, but they come with a heftier price tag. Now, if you go to Amazon or HobbyTron, you’ll find a range of speed controllers with different features and price points. It’s not about which one is better overall, but which one is better for you. Consider the type of RC device you’re using and what you’re willing to spend. Or perhaps, like an RC enthusiast I once met, try out both kinds and make the choice yourself. Remember, when you’re learning how to connect an RC speed controller, the first step is choosing the right ‘brain’ for your device.
What are the differences between brushed and brushless RC speed controllers?
Well, pal, you’ve come to the right place! Brushed and brushless RC speed controllers can appear pretty similar to the untrained eye, but there are some key differences you should know about. Picture it like this – brushed controllers are like that old but reliable coffee machine, doing the job, but perhaps lacking some of the snazzy features of the newer models. They’re simple, serviceable, and cost-effective, but they do tend to wear down over time as the brushes inside get ragged.
On the other hand, brushless RC speed controllers are like the barista-quality espresso machine you’ve been eyeing up. They’re efficient, smooth, and remarkably durable, thanks to not having those wear-prone brushes. Sure, they might cost a bit more, but they do provide better performance and longevity.
Now, you need to consider your needs. If you’re just starting with RC and want to dip your toes in the water without splashing too much cash, a brushed controller might be your go-to. But if you’re a bit of a pro, or someone who loves a smooth, high-performing RC unit, then the brushless controller might just be worth the investment.
Remember, connecting your speed controller could be a bit tricky, particularly for the brushless ones. It’s like doing a complicated jig-saw puzzle but once you get the hang of it, you’ll have it down pat. Just keep at it. This decision isn’t just about the technical differences, but also what feels right for you. Adventure is the spice of life, after all!
Connecting Your RC Speed Controller
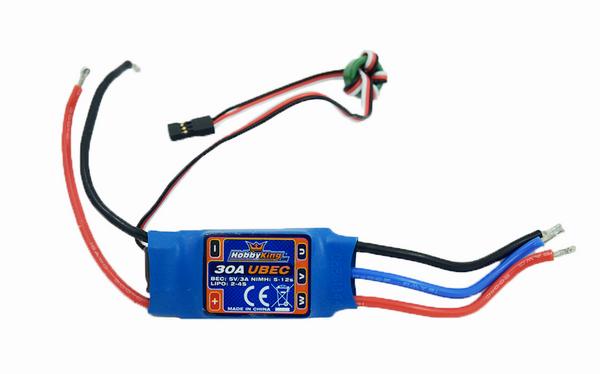
Alright, let’s get our hands on the connection process for RC speed controllers. It’s time to navigate the intricate circuitry of technology, and the journey is thrilling. Grab your trusty Phillips-head screwdriver and your new speed controller, breathe in, and let’s get this show on the road. The first thing you need to do is identify your power source, and connect it to the controller using the plug provided. If your controller is brushless, the three wires on the controller align with the three wires on the motor. With a brushed controller, you only have two wires to worry about. You’re essentially playing matchmaker here, connecting each wire to its corresponding color on the motor. So, let’s say you have a red wire and a black wire on your controller. The red wire is the “positive” wire, and it’s going to connect to the positive terminal on your motor. The black wire is the “negative” and takes up residence on the negative terminal. To make sure your connections are secure, you’ll want to solder them together. You’ve essentially given your RC device its heartbeat. Amazing, isn’t it?
What tools do I need to connect my RC speed controller to a motor?
So, you’re all set to connect your RC speed controller to your motor, right? Brilliant! First things first, you’ll require just a couple of tools. Start with a good-quality soldering iron and some solder. You’ll use these tools to create secure connections and ensure excellent conductivity. Now, don’t forget your heat shrink tubing – it’s essential to insulate the wiring to prevent short circuits. Apart from these, you must have wire strippers handy to cleanly cut and strip the ends of the wires. And lastly, a set of screwdrivers will come in handy for securing everything in place. Remember, having the right tools can make all the difference between a smooth sailing connection job and a frustrating DIY nightmare. So get your gear in order, take your time, and you’ll have that speed controller connected in no time!
Connecting the RC Speed Controller
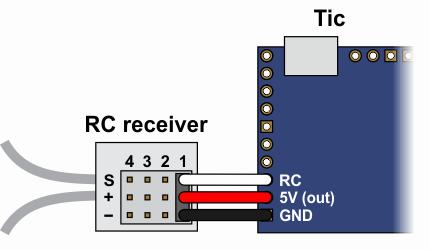
If you’re new to this, you may find yourself a little puzzled at this stage. Fear not, my fellow RC enthusiast! Let’s untangle the wires to your query, literally. Start by looking toward the heart of your device, the motor. It’s here that you will find three wires, color-coded as yellow, red, and black. Now, find a thin three-wire cable hanging out of your speed controller. Match the colors and voila! You’ve just made a connection. But, this is just the first leg of your journey. We’ll need to establish its communication with the receiver next.
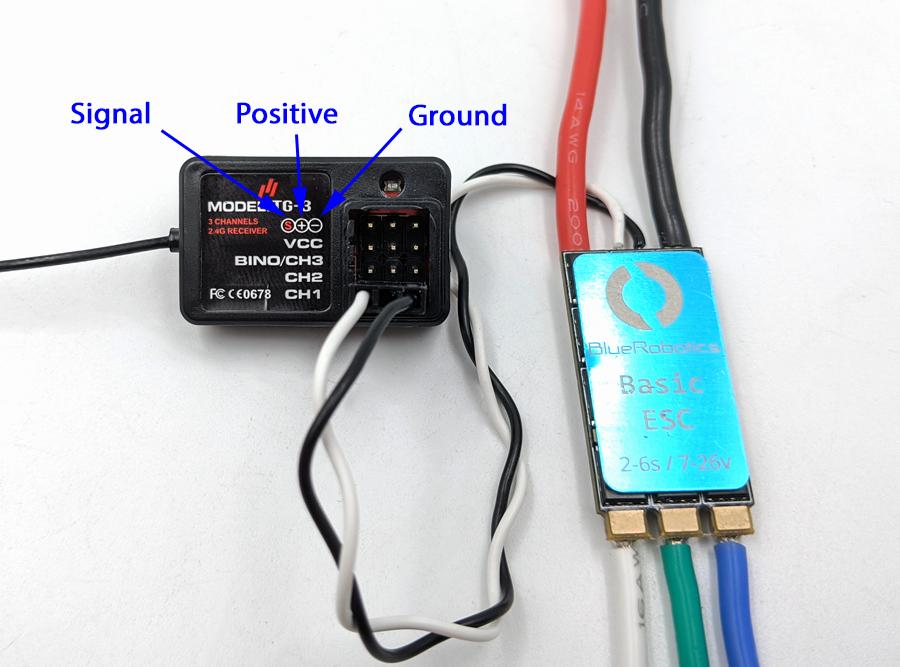
Typically, you will find the speed controller marked ‘CH2’ or ‘Throttle’ on your receiver. If you have a look at your speed controller, on the opposite end you’ll find a three-wire cable with a plug. This plug goes into the receiver’s throttle channel. Do you see it coming together?
Here’s where it starts getting a bit tricky – power source. We need to connect the RC speed controller to a battery for power supply. The battery will most likely have a pair of red and black wires. These are to be connected with the battery ports on the speed controller, also with a red and black wire. Remember, red to red, black to black.
Always bear in mind, in the vast universe of RC electronics, matching wire colors are like beacons guiding us to the correct connection. In this labyrinth, they are your lifelines. For more visuals or a step-by-step instruction, I highly recommend a quick visit to www.instructables.com. They have some great resources to help guide you on how to connect RC speed controller. Keep at it, you’re doing great! Just remember to take your time. After all, Rome was not built in a day, and neither was a fully functional RC vehicle. Experience will guide you through the similar matching wires, patience will see to it that you connect them correctly. Hang in there!
What are some tips for connecting an RC speed controller to a battery for power supply?
Hooking up an RC speed controller to a battery isn’t as daunting as it sounds, trust me. Firstly, you’ll need to confirm that your speed controller is compatible with your battery. A quick check on the product specs should clear this up, just to be sure you’re not damaging your gear. A wrong match could lead to a poor performance, or even worse, damage your RC units.
Now, let’s get down to the nitty-gritty. Connect the red wire from your speed controller to the positive terminal of your battery. Then, connect the black wire to the negative terminal. This bit is pretty much like connecting a basic stereo, where the color of the wires guide you through. It’s super straight forward!
However, do remember that speed controllers can get pretty hot. So avoid wrapping them in anything that won’t dissipate heat, like foam or tape. Your speed controller needs some fresh air to breathe and keep cool.
Finally, double-check everything. Seriously, I can’t stress this enough. Once you’ve made your connections, it’s crucial to ensure that everything is hooked up correctly and securely. You don’t want loose connections causing havoc during a race or a peaceful flyby. Safety first, my friend.
Go on, give your RC unit a new lease of life with the perfect power supply. You’ve got this!
Troubleshooting Tips for RC Speed Controller Connectivity
Even with the best laid plans, problems can arise right? So, let’s talk about some common issues you might face when learning how to connect an RC speed controller and ways to troubleshoot these pesky hiccups. Just like when you’re trying to fit a square peg into a round hole, sometimes connectors don’t align or function as expected. But who said a little bump in the road couldn’t be smoothed out? For instance, if you’re connecting your speed controller and the motor refuses to spin, you might need to recalibrate the connector. Consider this as an opportunity to “turn a new leaf” in your controller’s operational process. Don’t worry, it’s not as complicated as it sounds! All you need to do is:
- Disconnect the battery and then reconnect it while holding down the set button on your speed controller.
- Keep pressing the button until you hear a beep. This indicates that the calibration process has begun. Release it once you hear the beep.
- Once the calibration process is complete, another beep will sound, indicating that it’s safe to release the set button.
On the other hand, if you’re experiencing more persistent or uncommon issues, you might want to check out online platforms like rcuniverse.com or Reddit, where a plethora of hobbyists share their personal experiences and solutions to a variety of RC related problems. Trust us, there’s a whole community out there just waiting to help you master your RC vehicle set up! It’s a world where the devil really is in the detail.
What are some common issues when learning how to connect an RC speed controller?
Understanding the wiring diagram is one of the most common hurdles when learning how to connect an RC speed controller. It requires time, patience, and a pinch of technical savviness to decipher all those crisscrossing lines and symbols, but trust me, it gets easier with practice. Besides, not all controllers and motors are created equal, giving rise to the issue of compatibility. Checking if your devices are compatible can save a whole lot of frustration down the road. Then there’s the eternal question of soldering: to solder or not to solder? Incorrect or poor-quality soldering can lead to loose connections, causing your RC speed controller to malfunction or not function at all. Lastly, be aware that setting the controller’s parameters incorrectly, or the wrong program selection, can lead to suboptimal performance. So, my friend, if you’re struggling with these issues, remember you’re not alone. RC hood is full of enthusiasts like us, always ready to lend a helping hand, learn and grow together. Don’t forget, Rome wasn’t built in a day, and neither will your RC mastery. Keep at it!
Connecting your RC speed controller
When strutting confidently through the world of RC devices, remember the good old saying, ‘Safety first.’ It’s more than just an age-old mantra, it’s a rule to RC by. Safety precautions are the key to a smoother ride, and to avoid becoming a casualty statistic. Regrettably, faulty speed controllers have notoriously been the cause of more than just a handful of RC accidents. Now, don’t let that scare you. After all, knowledge is power, and you’re about to become very powerful indeed. From websites like RC Car Action to resources like Flite Test, you can gather enough data to avoid most mishaps. These platforms provide insightful tips, like ‘Remember to disconnect the battery when you’re not using the RC device.’ or ‘Never overlook a wire that seems out of place.’ May sound rudimentary, but trust me, overlooking such small aspects can lead to big problems. And you don’t want your RC flying off into the sunset without you now, do you? Now, with this knowledge on how to connect RC speed controller safely lodged in your brain, go ahead, and make your RC device obey your every whim – safely of course!
What are some safety tips for using RC devices?
Keeping safety at the forefront while using RC devices is non-negotiable, buddy. Right off the bat, get familiar with your RC gadget, understand its construction and operation deeply and thoroughly. Always stick with following the instructions, detailed in the manual. Never, and I mean never, operate RC devices near people or pets that may get injured, and definitely not in crowded areas.
Remember, your RC device isn’t a spaceship with infinite fuel. Monitor the battery life regularly to avoid any sudden malfunctions or accidents. Worn out batteries? Swap `em out. Low on juice? Just recharge `em! Make it a rule to not over-charge batteries as it can significantly reduce their lifespan, besides creating a potential fire hazard (and losing a fun pastime to boot!).
Getting a hold of the controller? Easy peasy. Understand the controls, build awareness of the surroundings and always keep it within sight. More importantly, be kind to your device, it’s not a military-grade tank. Avoid collisions and harsh landings, as much as you can, to save your precious gadget from any major damage.
Connections are important in life, same goes for RC device with its speed controller. Word to the wise – triple-check every connections. Even one faulty or loose wire can brutally affect the performance. Allergies are not just for humans, devices have them too. Keep your RC rig away from water and any extreme temperatures. Electronics react badly to extreme conditions, and I bet you don’t want a fried board, do you?
Through all this, remember – RC devices are meant to be fun! Just like anything else, there’s a learning curve, you’ll get there. Enjoy every step of the way and the mishaps will be nothing more than tiny speed bumps. They happen to the best of us!
What a journey! Now you know everything you need to connect the ‘brain’ to your RC masterpiece. By understanding the process of how to connect an RC speed controller, you’ve taken an essential step towards experiencing the exhilarating world of RC racing. But remember, this is the beginning of a lifetime of tinkering, improving, and navigating the circuitry of these fantastic machines. Head on over to RC Model Reviews or RC Driver on YouTube for quick tutorials that will take your understanding even further. To share your successes (and those inevitable ‘learning experiences’), join online forums like RCGroups, where the devil is indeed in the detail. Every step you take, every problem you solve, takes you closer to the thrill of your RC device responding seamlessly to your commands. Credentials in hand, go forth and conquer, Pilot! Your RC adventure awaits.